Calman takes advantage of the AJA Video Systems LUT-box features to calibrate a video display with a 10-bit 17x17x17 3D cube lookup table (LUT) for SMPTE video level signals. This setup guide assists you in calibrating the AJA LUT-box with the Calman Color Cube workflow.
Calman Required Version
- Version 5.3.6 or newer
Calman Recommended Workflow
- Color Cube (3D LUT)
AJA LUT-box Required Firmware
- Version 2.3 or newer
AJA LUT-box USB Device Driver
- Loaded with AJA Mini-Config software
- AJA Website
Creating a 3D LUT Display Calibration File for the AJA LUT-box
Calman creates a 3D LUT display calibration file for the AJA LUT-box without immediately loading the file into the LUT-box. Calman creates a .cube file with the proper data format for later loading into the LUT-box (as detailed below). The AJA LUT-box does not need to be available during this display calibration and file creation process. The AJA LUT-box, with firmware version 2.3 or 2.4, supports 3D LUTs only for SMPTE range operation.
The AJA Mini-Config software is used to load the 3D LUT file into the AJA LUT-box. The Input tab and HDMI Output tab or SDI Output tab in the utility should be set to SMPTE.
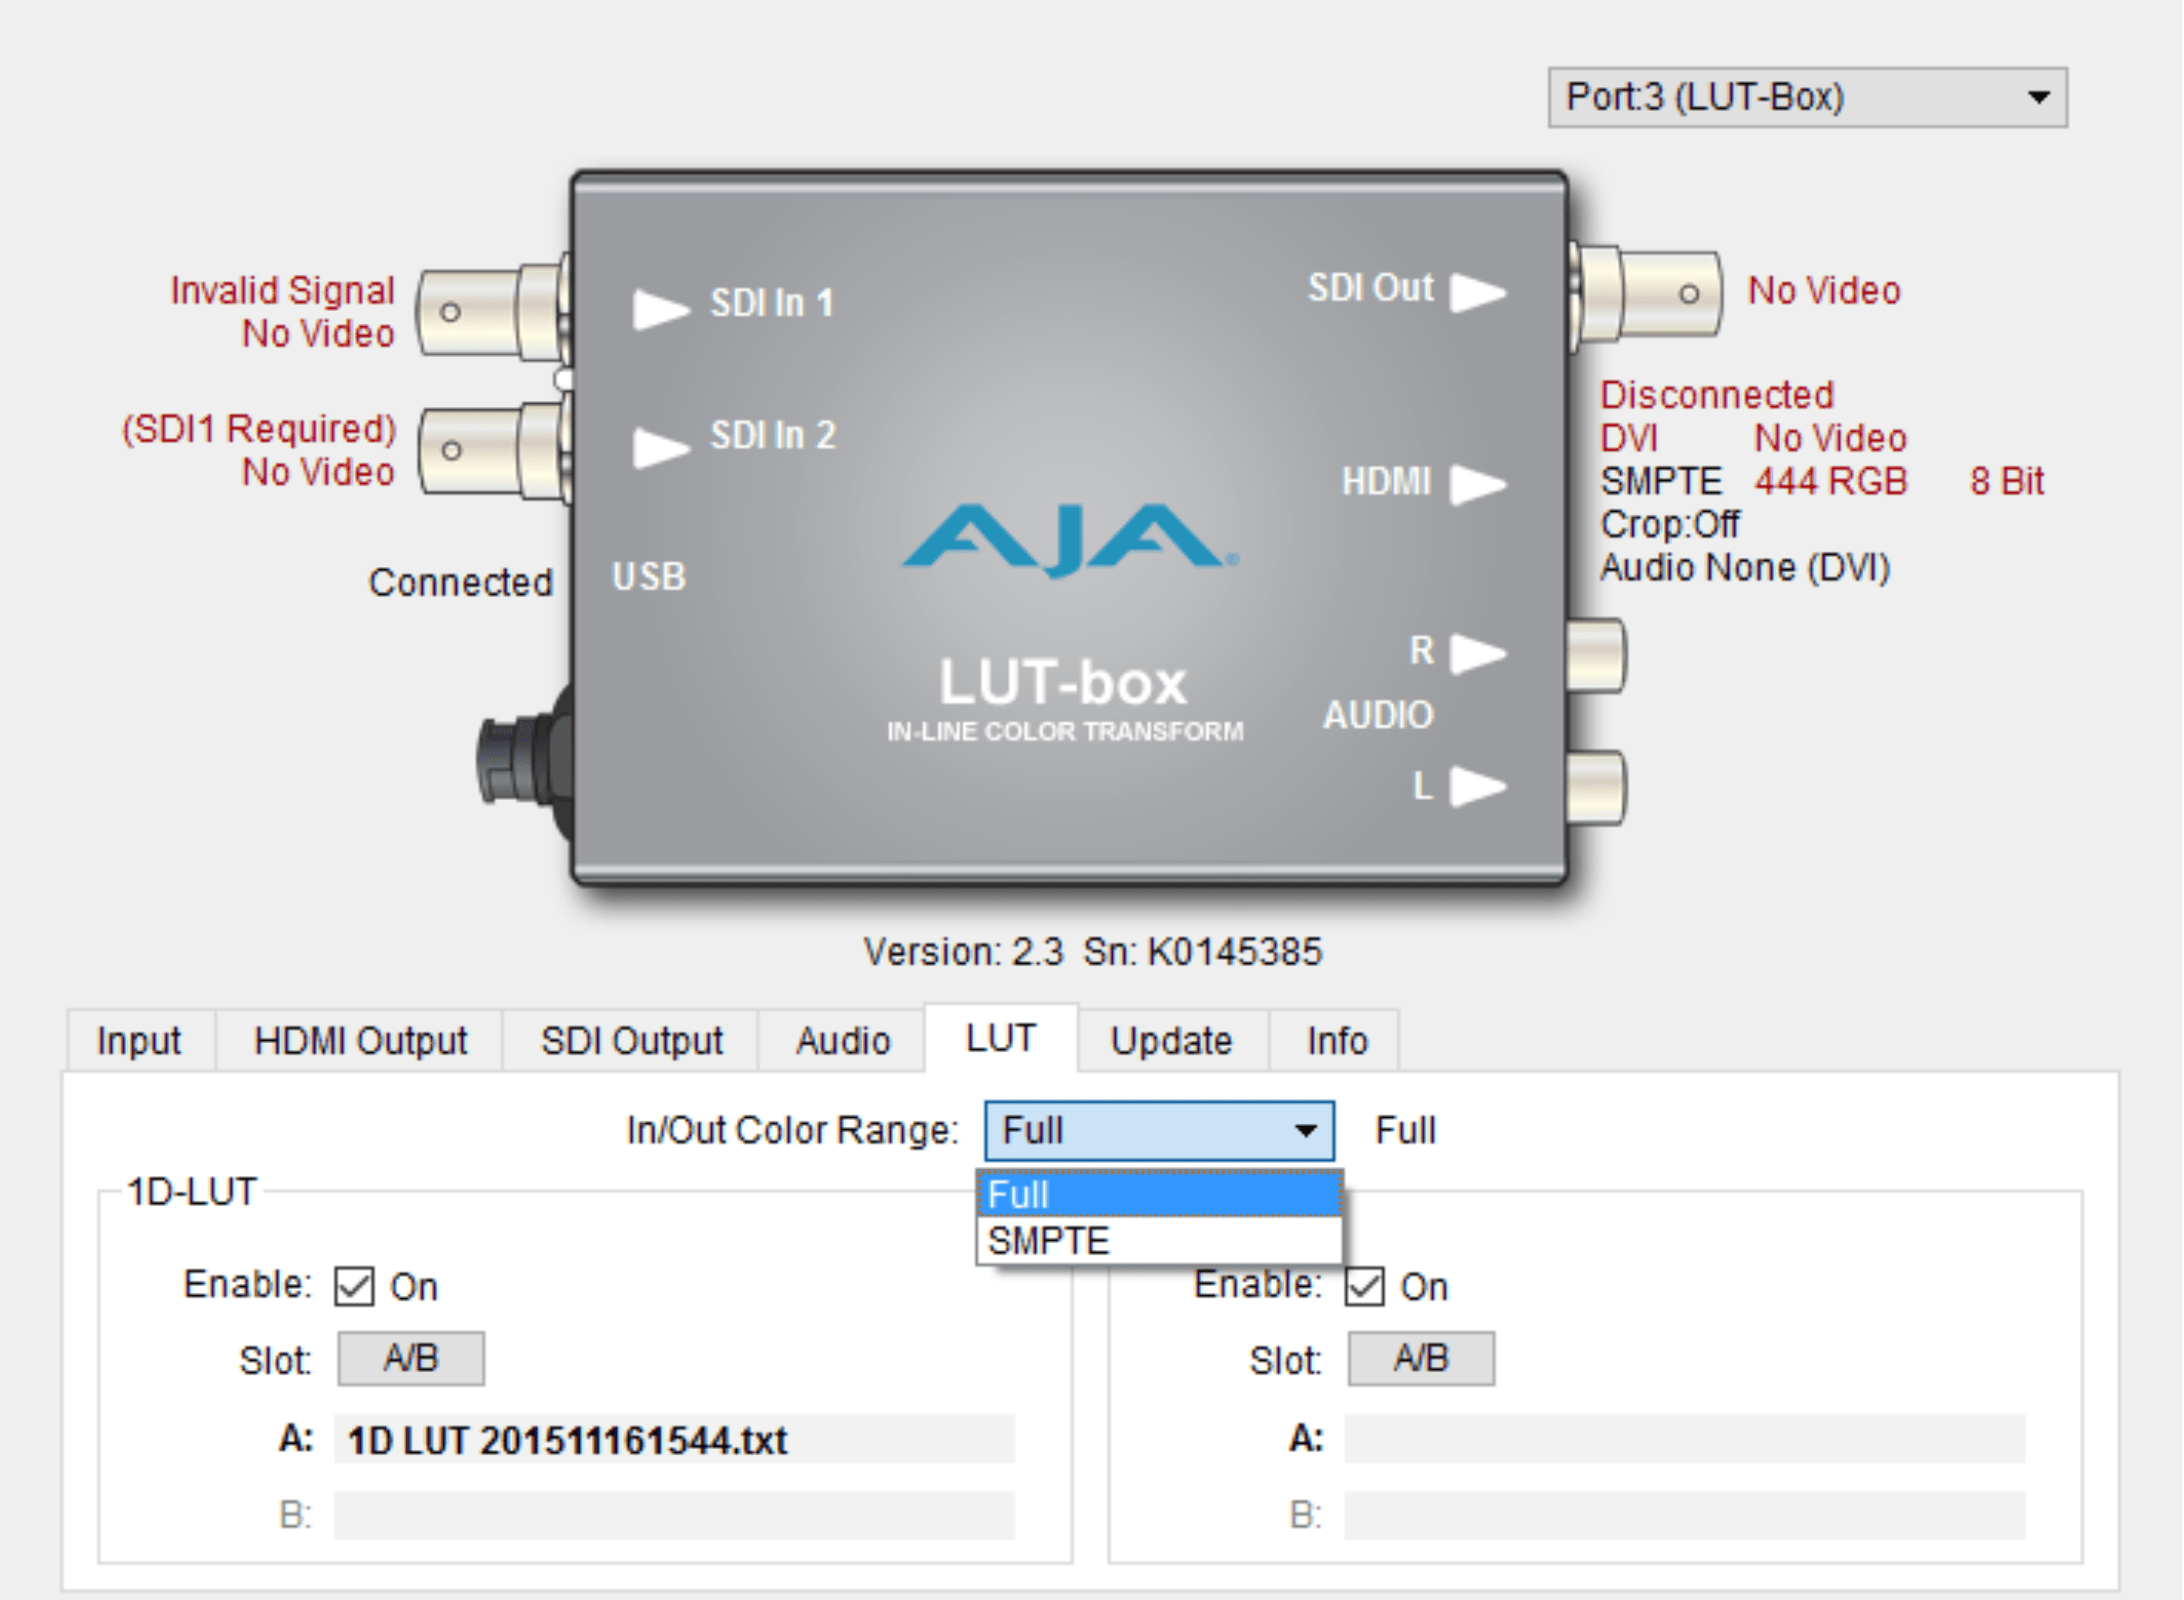
When connected to an AJA LUT-box with firmware version 2.3 or higher, the LUT tab in the AJA Mini-Config utility provides the In/Out Color Range option for ‘Full’ or ‘SMPTE.’ This LUT range option must be set to Full to support a 3D LUT
The Color Cube workflow in Calman is used to create 3D display calibration LUTs. In the Calman main menu, select Open Workflow Template / Color Cube (3D LUT). Proceed through the instructions on each step of the Color Cube workflow, using the following notes for AJA LUT-box specifics.
Initial Setup
In the Initial Setup section of the Color Cube workflow, step through the following pages
Session Setup – Meter Connect
- Connect your color meter to the Calman computer
- On the Session Setup page, click the Find Meter button to connect your meter.
- Under the Target Display Type drop-down select the display type that is being calibrated
Session Setup – Source Connect
- On the Session Setup page, click the Find Source button.
- On the Source dialog, select your desired test pattern source
Session Setup – LUT Device Setup
- On the Session Setup page, click the Find 3D LUT Device button.
- On the Display dialog, under Manufacturer, select SpectraCal
- Under Model, select SpectraCal – Cube Generator (3D LUT)
- Click Connect
Display Pre-Test section
In the Display Pre-Test section of the Color Cube workflow, you can measure the performance of a display before you calibrate it, on the Gamma & ColorChecker page and on the Advanced Linearity page. If the Performance Analysis page indicates any red lights for display performance, you may wish to optimize the display’s picture controls before creating a 3D calibration LUT. Click the Display Optimization button to proceed to that workflow section.
Otherwise, click the Calibrate Cube LUT button to proceed directly to the Display Calibration section.
Display Optimization section
To optimize the display’s picture controls before creating a 3D calibration LUT, advance through the adjustment pages in the Display Optimization section of the workflow.
Display Calibration section
In the Display Calibration section of the Color Cube workflow, there are provisions for calibrating both a 1D RGB LUT (1D Ramp LUT page) and a 3D cube LUT (3D Cube LUT page). When we are calibrating an AJA LUT-box with a 3D LUT, we will skip the 1D Ramp LUT page (1D RGB LUT) and use only the 3D Cube LUT page.
1D Ramp LUT page
Skip over this page when creating a 3D LUT file for an AJA LUT-box, since we do not need to create a 1D LUT.
3D Cube LUT page
- On the 3D Cube LUT page, click the AutoCal button (rotating arrows) at the right end of the meter action buttons. The AutoCal Setup dialog then appears
- Under File Format, select “AJA – Lut box (.cube).”
- Under Output Cube Size, select ‘17 points 16-235.’
- Under File Path, select the desired directory path and provide a name for the LUT file that Calman will create (e.g. monitor ID and date).
- Under Calibration Type, select the desired type of 3D LUT calibration process.
- IR Profile (time-based): Creates the best quality display calibration 3D LUT possible in the selected period of time. You select how much display quality you have time for, from 30 minutes to maximum display quality (6,000 points max). Uses Intelligent Resolution Profiling to search out the most nonlinear color space areas and correct those first.
- IR Profile (point based): Creates the best quality display calibration 3D LUT possible with the selected number of measurement points (1,000 – 10,000 points). Uses Intelligent Resolution Profiling to search out the most nonlinear color space areas and correct those first.
- Lightning LUT: Creates a display calibration 3D LUT in five minutes or less. Produces a very high-quality result on professional displays with moderate linearity. Displays with significant nonlinearity may produce marginal results.
- Under Video Range, select “SMPTE (16-235)” if you are calibrating a video display that clips signal values above reference white.
- Click OK.
When the AutoCal 3D LUT calibration completes, Calman automatically writes the optimized 17x17x17 LUT calibration file to the previously selected location. You are done creating a display calibration 3D LUT for the AJA LUT-box. You can now skip to the Loading a 3D LUT file to the AJA LUT-box section below to load the LUT into the LUT-box.
Display Validation section
After you have loaded the new 3D LUT into the AJA LUT-box, you can return to this Display Validation section of the Color Cube workflow to test the performance of the display, to validate the accuracy of the display when using the 3D calibration LUT. You can switch back to the Test/Document Display page to compare to the pre-calibration performance
Loading a 3D LUT file to the AJA LUT-box
To load the Calman 3D LUT file into an AJA LUT-box:
- Install the AJA Mini-Config software on your Mac or PC.
- Connect the LUT-box to the PC or Mac via the supplied USB cable. Connect the external power supply to the LUT-box.
- Run the AJA Mini-Config software.
- If not already done, on the Mini-Config software Input and Output tabs, select the appropriate signal settings.
- On the Mini-Config software LUT tab, select On for Enable 3D LUT.
- Under Apply Slot, select Slot 1 or Slot 2.
- Click on the name box for 3D LUT 1 or 3D LUT 2 to open a file browser.
- Navigate to the location of the desired LUT file.
- Select the LUT file and click Open.
- Click the associated Write Slot 1 or Write Slot 2 button on the right. The LUT data will be written to the selected slot.
Done: The selected 3D LUT file is now contained in the AJA LUT-box. If you wish to validate the accuracy of the display when using the 3D calibration LUT, you can return to the Display Validation section of the Color Cube workflow.