![]()
- Please select your language below
- 请在下面选择您的语言
English
This workflow offers a comprehensive set of tools to validate your display’s performance against iQIYI standards. It guides you through the necessary steps to assess and confirm color accuracy, brightness levels, and overall image quality, ensuring your display meets the required specifications for optimal content presentation.
Calman Required Version
- Calman Ultimate v5.16.1 or higher
Hardware Requirements
Setup
- From the Calman Menu in the top-left, choose Open Workflow Template -> Calibration and then select iQIYI
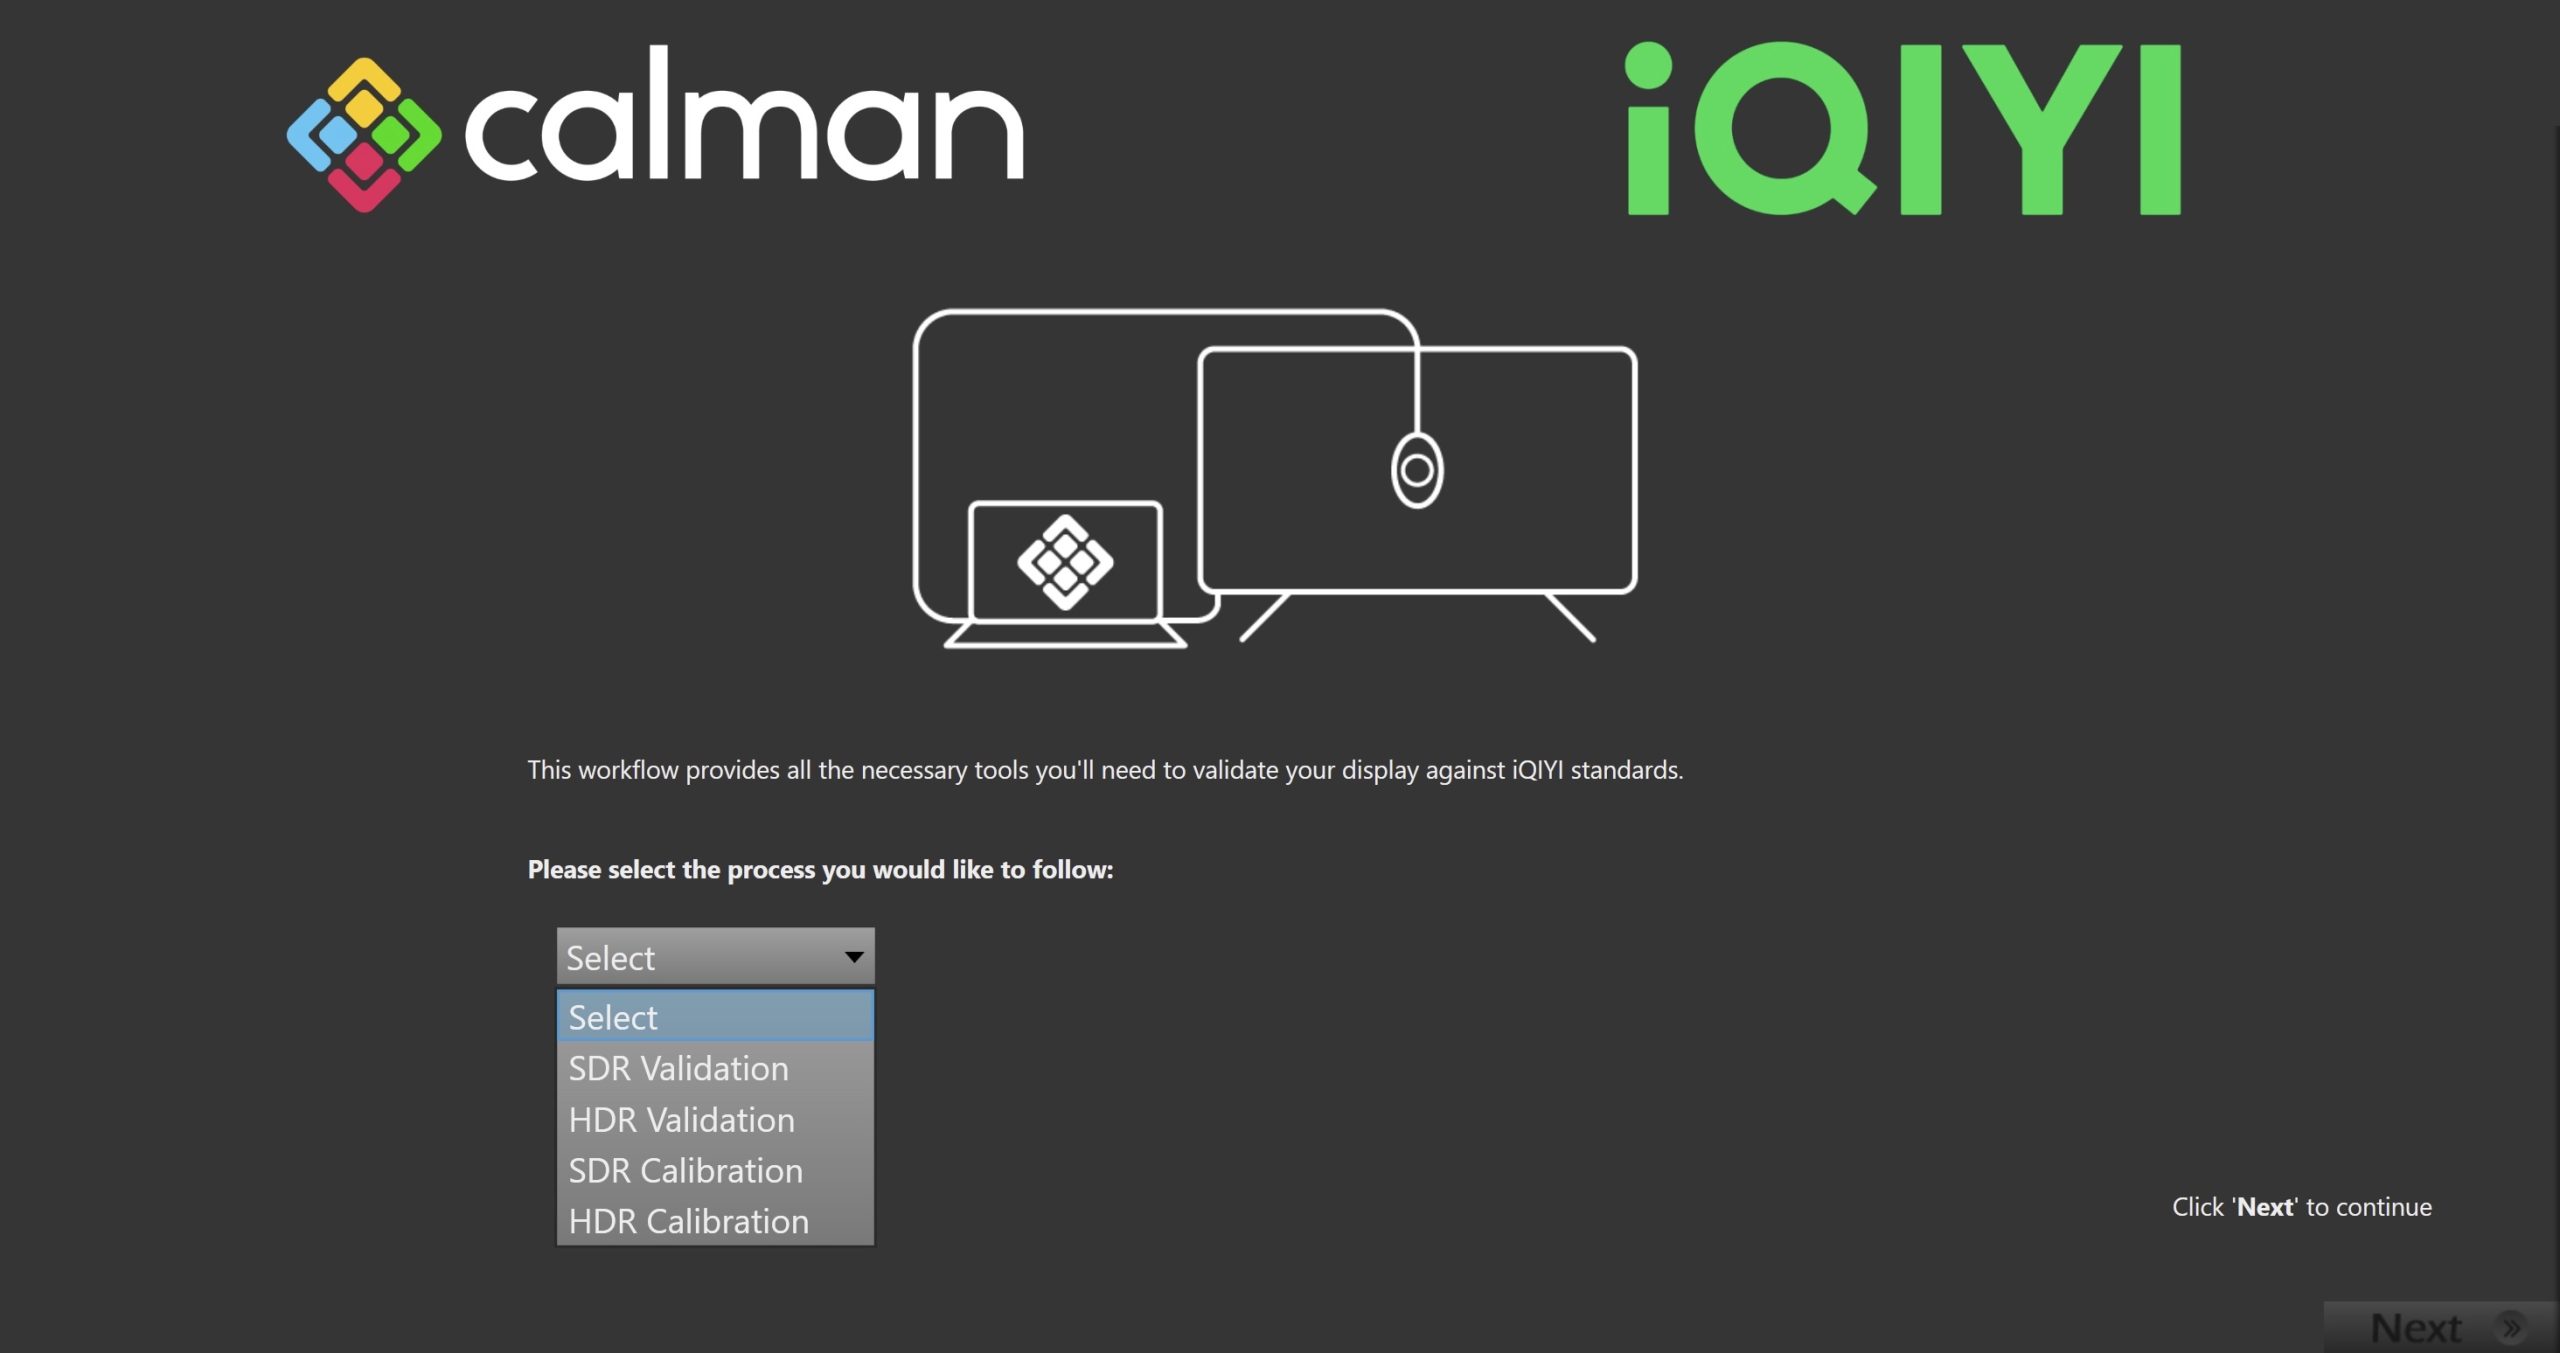
- On the introduction screen, you can select from the 4 processes included in the workflow. An iQIYI branded report will be generated at the end of each process.
- SDR Validation
- To verify a previous SDR calibration or the current state of a display’s grayscale and ColorChecker response.
- HDR Validation
- Includes advanced tools, like Peak Luminance vs Window Size, P3 and BT.2020 coverage, to verify a previous HDR calibration or the current state of a display in HDR
- SDR Calibration
- Includes all steps needed to perform a manual SDR calibration on your display
- HDR Calibration
- Includes all steps needed to perform a manual HDR calibration on your display
- SDR Validation
- Select the process you would like to follow, and click Next to continue to Hardware Connection
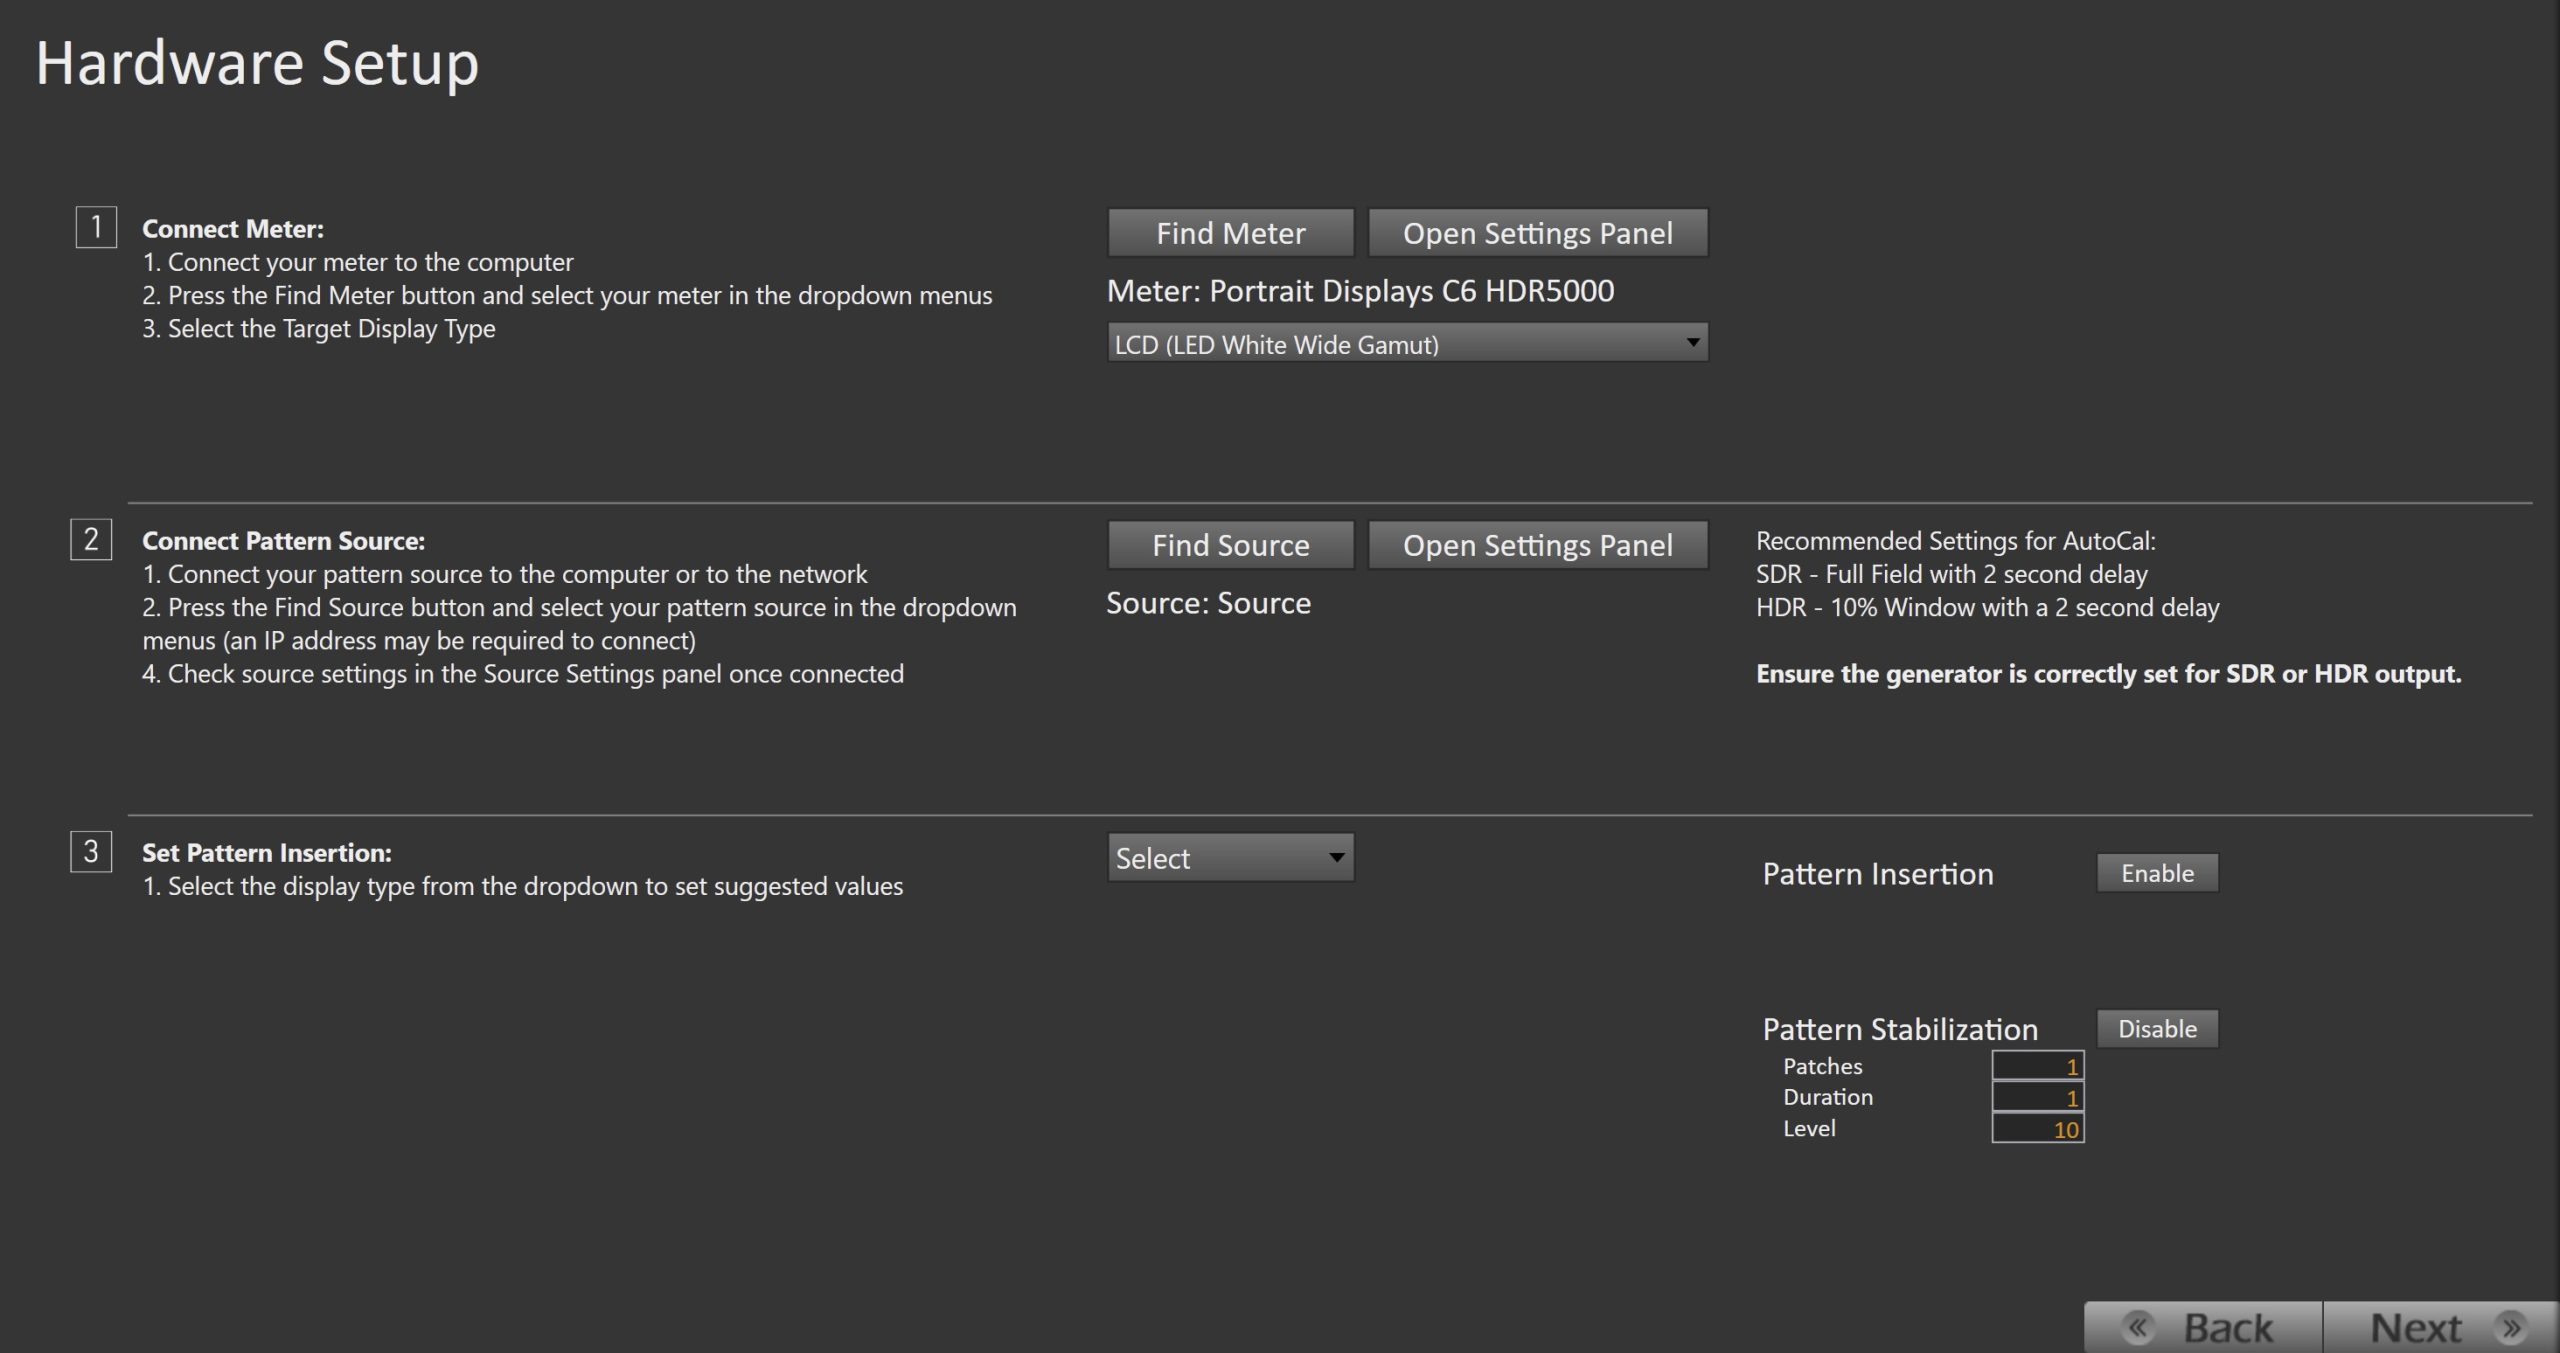
- Plug your meter into a USB port on the computer and press the Find Meter.
- When your meter is connected, select your display type from the dropdown
- Connect Pattern Source to your computer.
- Click the Find Source button, then select your source
- Select the pattern window size and delay
- Recommended Settings:
- SDR – Full Field with 2 second delay
- HDR – 10% Window with a 2 second delay
- Recommended Settings:
- Pattern insertion is used to help avoid panel temperature fluctuations and to keep the display from dimming due to burn-in protection algorithms.
- Select the display type from the dropdown to set suggested values
- Ensure your source is set to SDR or HDR corresponding to your choice above
- Click Next to proceed to calibration/validation target selection
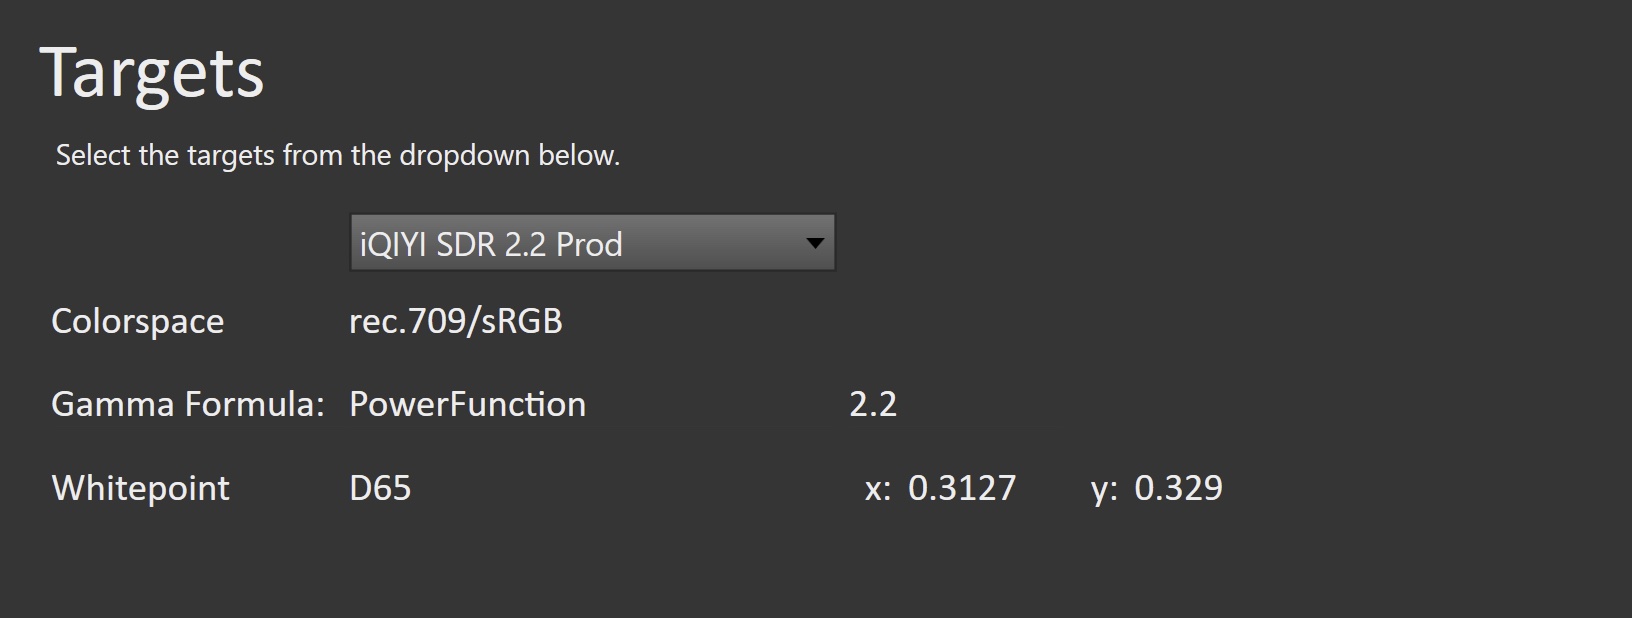
- Select your desired calibration/validation targets
- SDR:
- iQIYI SDR 2.2 Prod
- Rec709/Power 2.2/D65
- iQIYI SDR 2.4 Prod
- Rec709/Power 2.4/D65
- iQIYI SDR BT.1886 Prod
- Rec709/BT.1886/D65
- iQIYI SDR 2.2 Prod
- HDR
- iQIYI HDR BT2020 Prod
- BT.2020/ST.2084/D65
- iQIYI HDR P3 Prod
- P3/ST.2084/D65
- iQIYI HDR BT2020 Prod
- SDR:
- Click Next to continue
SDR Calibration
Step 1
- In this step, you’ll take measurements of the display before the calibration. These will be used to compare the calibration results.

- To take Pre-Calibration Measurements, click the Measure button to measure the display’s grayscale and ColorChecker response
- This will provide a point of reference to compare the calibration results
- Click Next to proceed
Step 2
- In this step, you will be able to adjust the Luminance of the display to match your desired target.
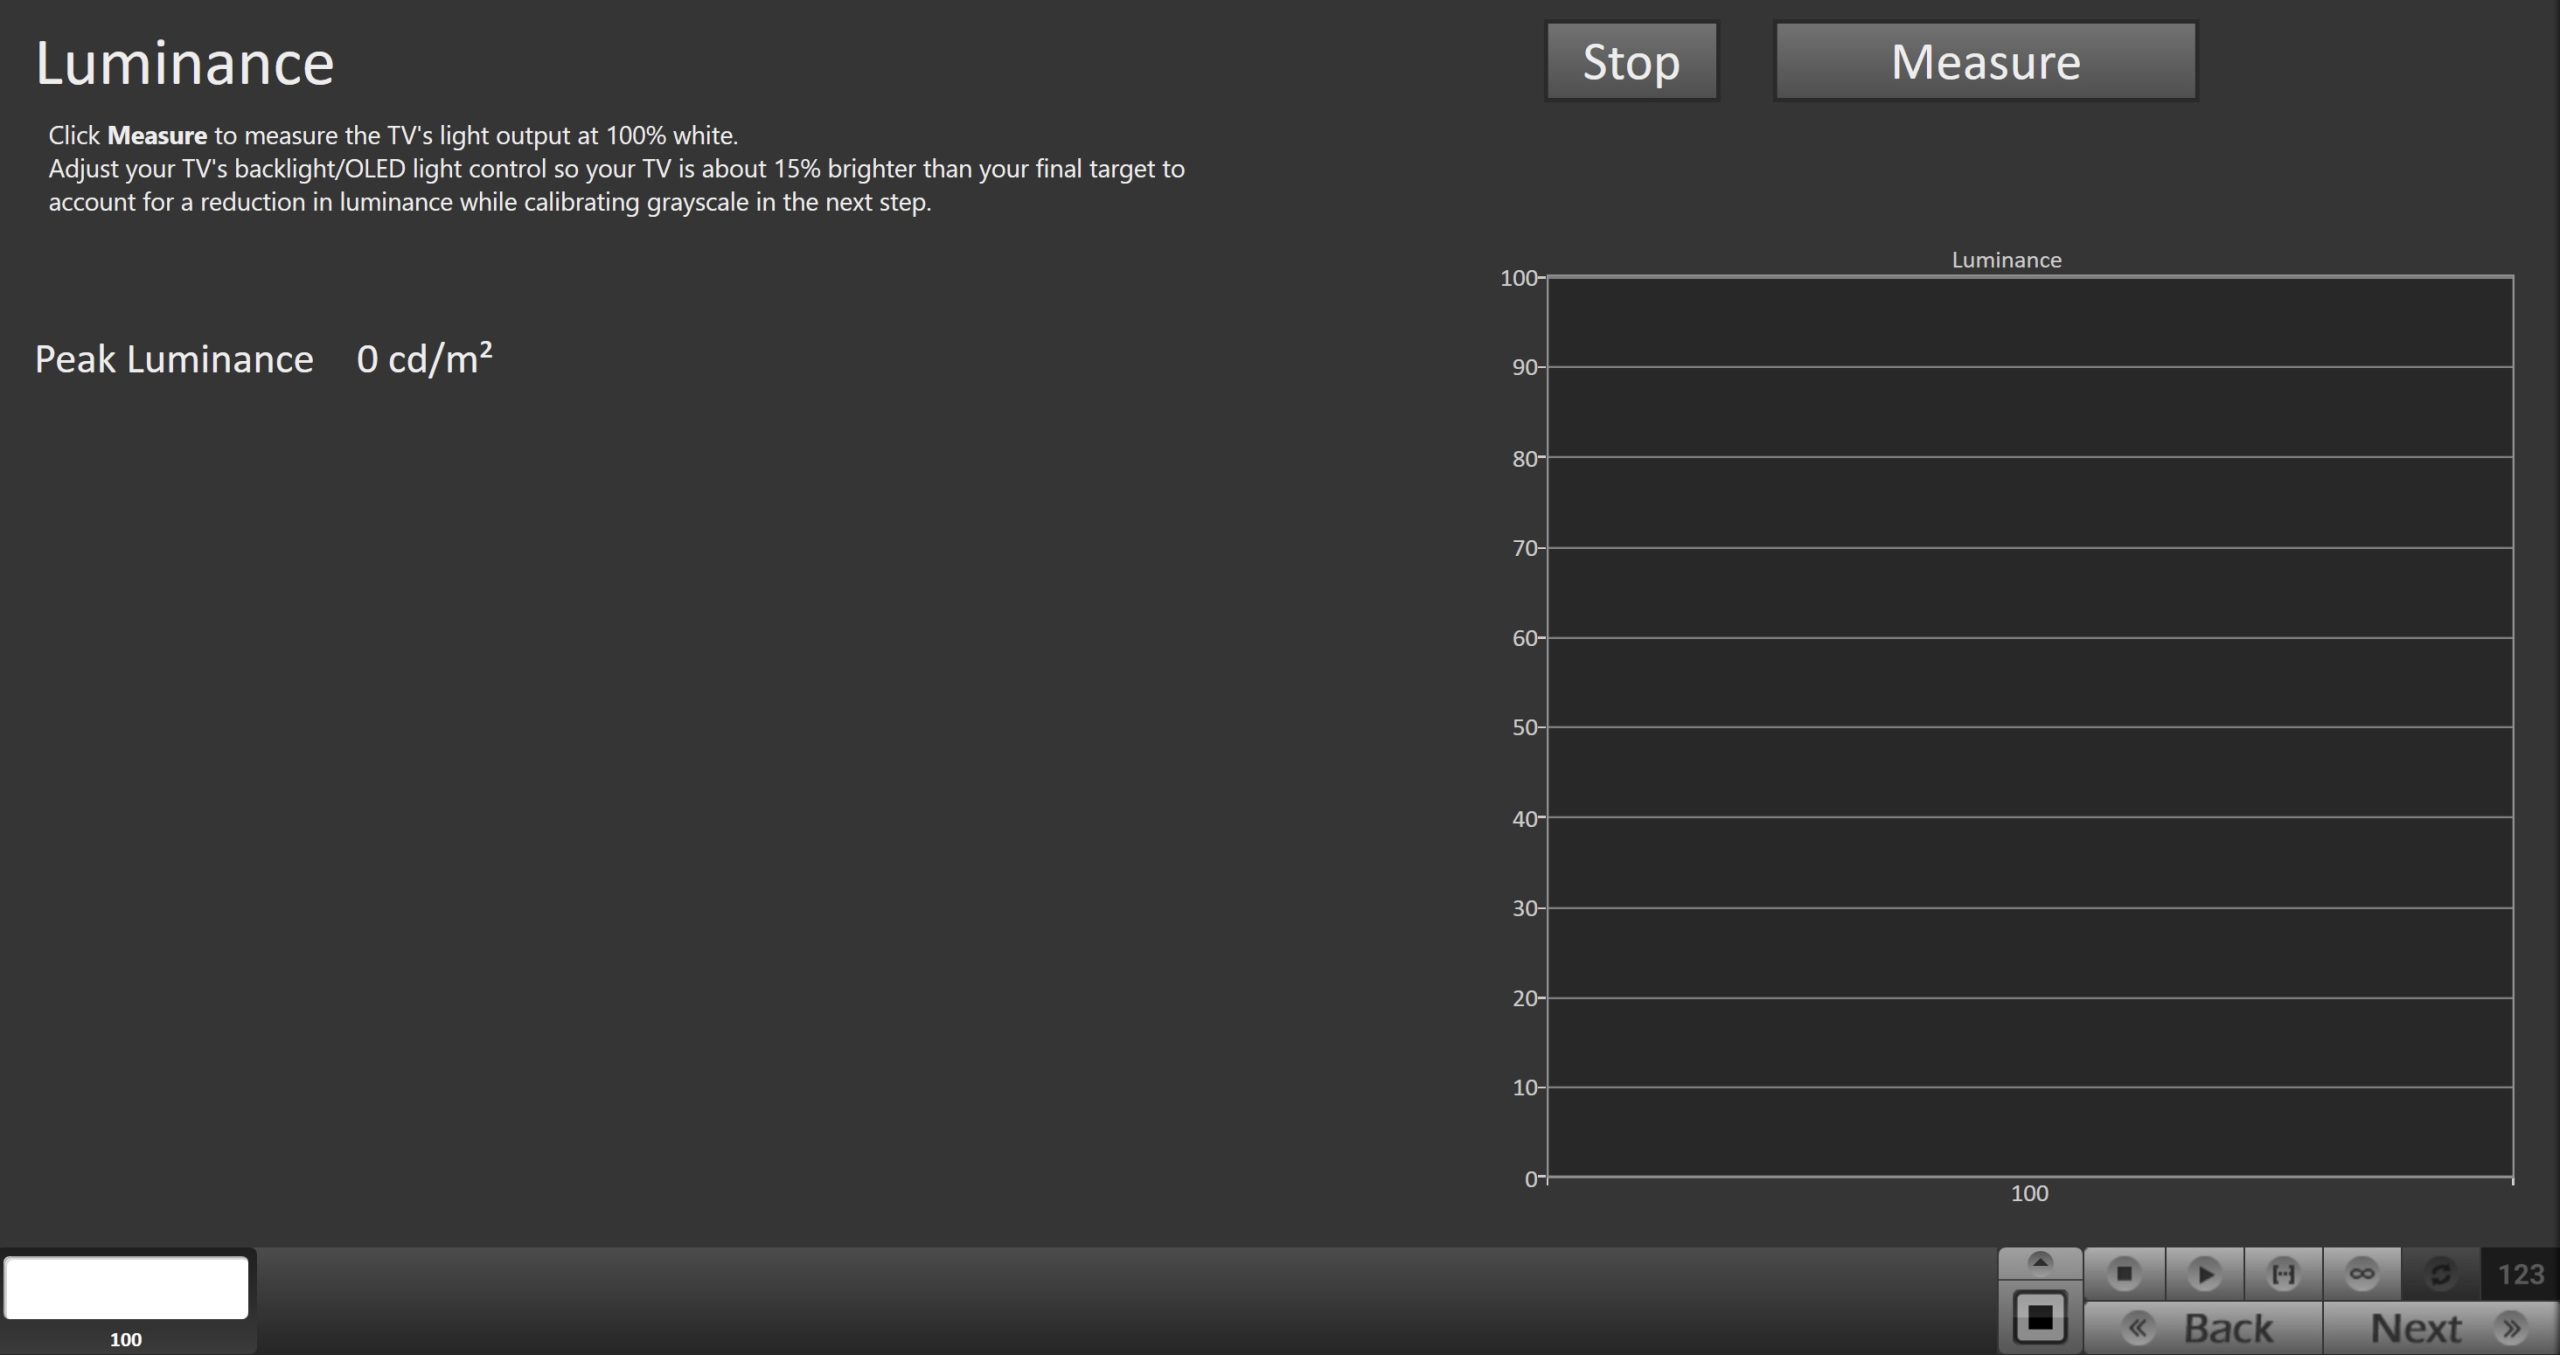
- Click the Read Continuous button to measure your monitor’s light output at 100% white and adjust the display’s peak white to the desired luminance.
- SDR reference luminance is 100nits, but you may need to target higher to account for the ambient light in your environment.
- Adjust your backlight control so your monitor is about 15% brighter than your final target to account for a reduction in luminance when calibrating the 1D LUT in the next step.
- Click Stop when luminance adjustment is complete
- Click Next to proceed
Step 3
- On this page, you’ll be able to adjust your display’s White Balance, or 2 point greyscale. The default points (20/100) are appropriate for most displays, but you can choose alternate points if your display adjusts greyscale at different points.
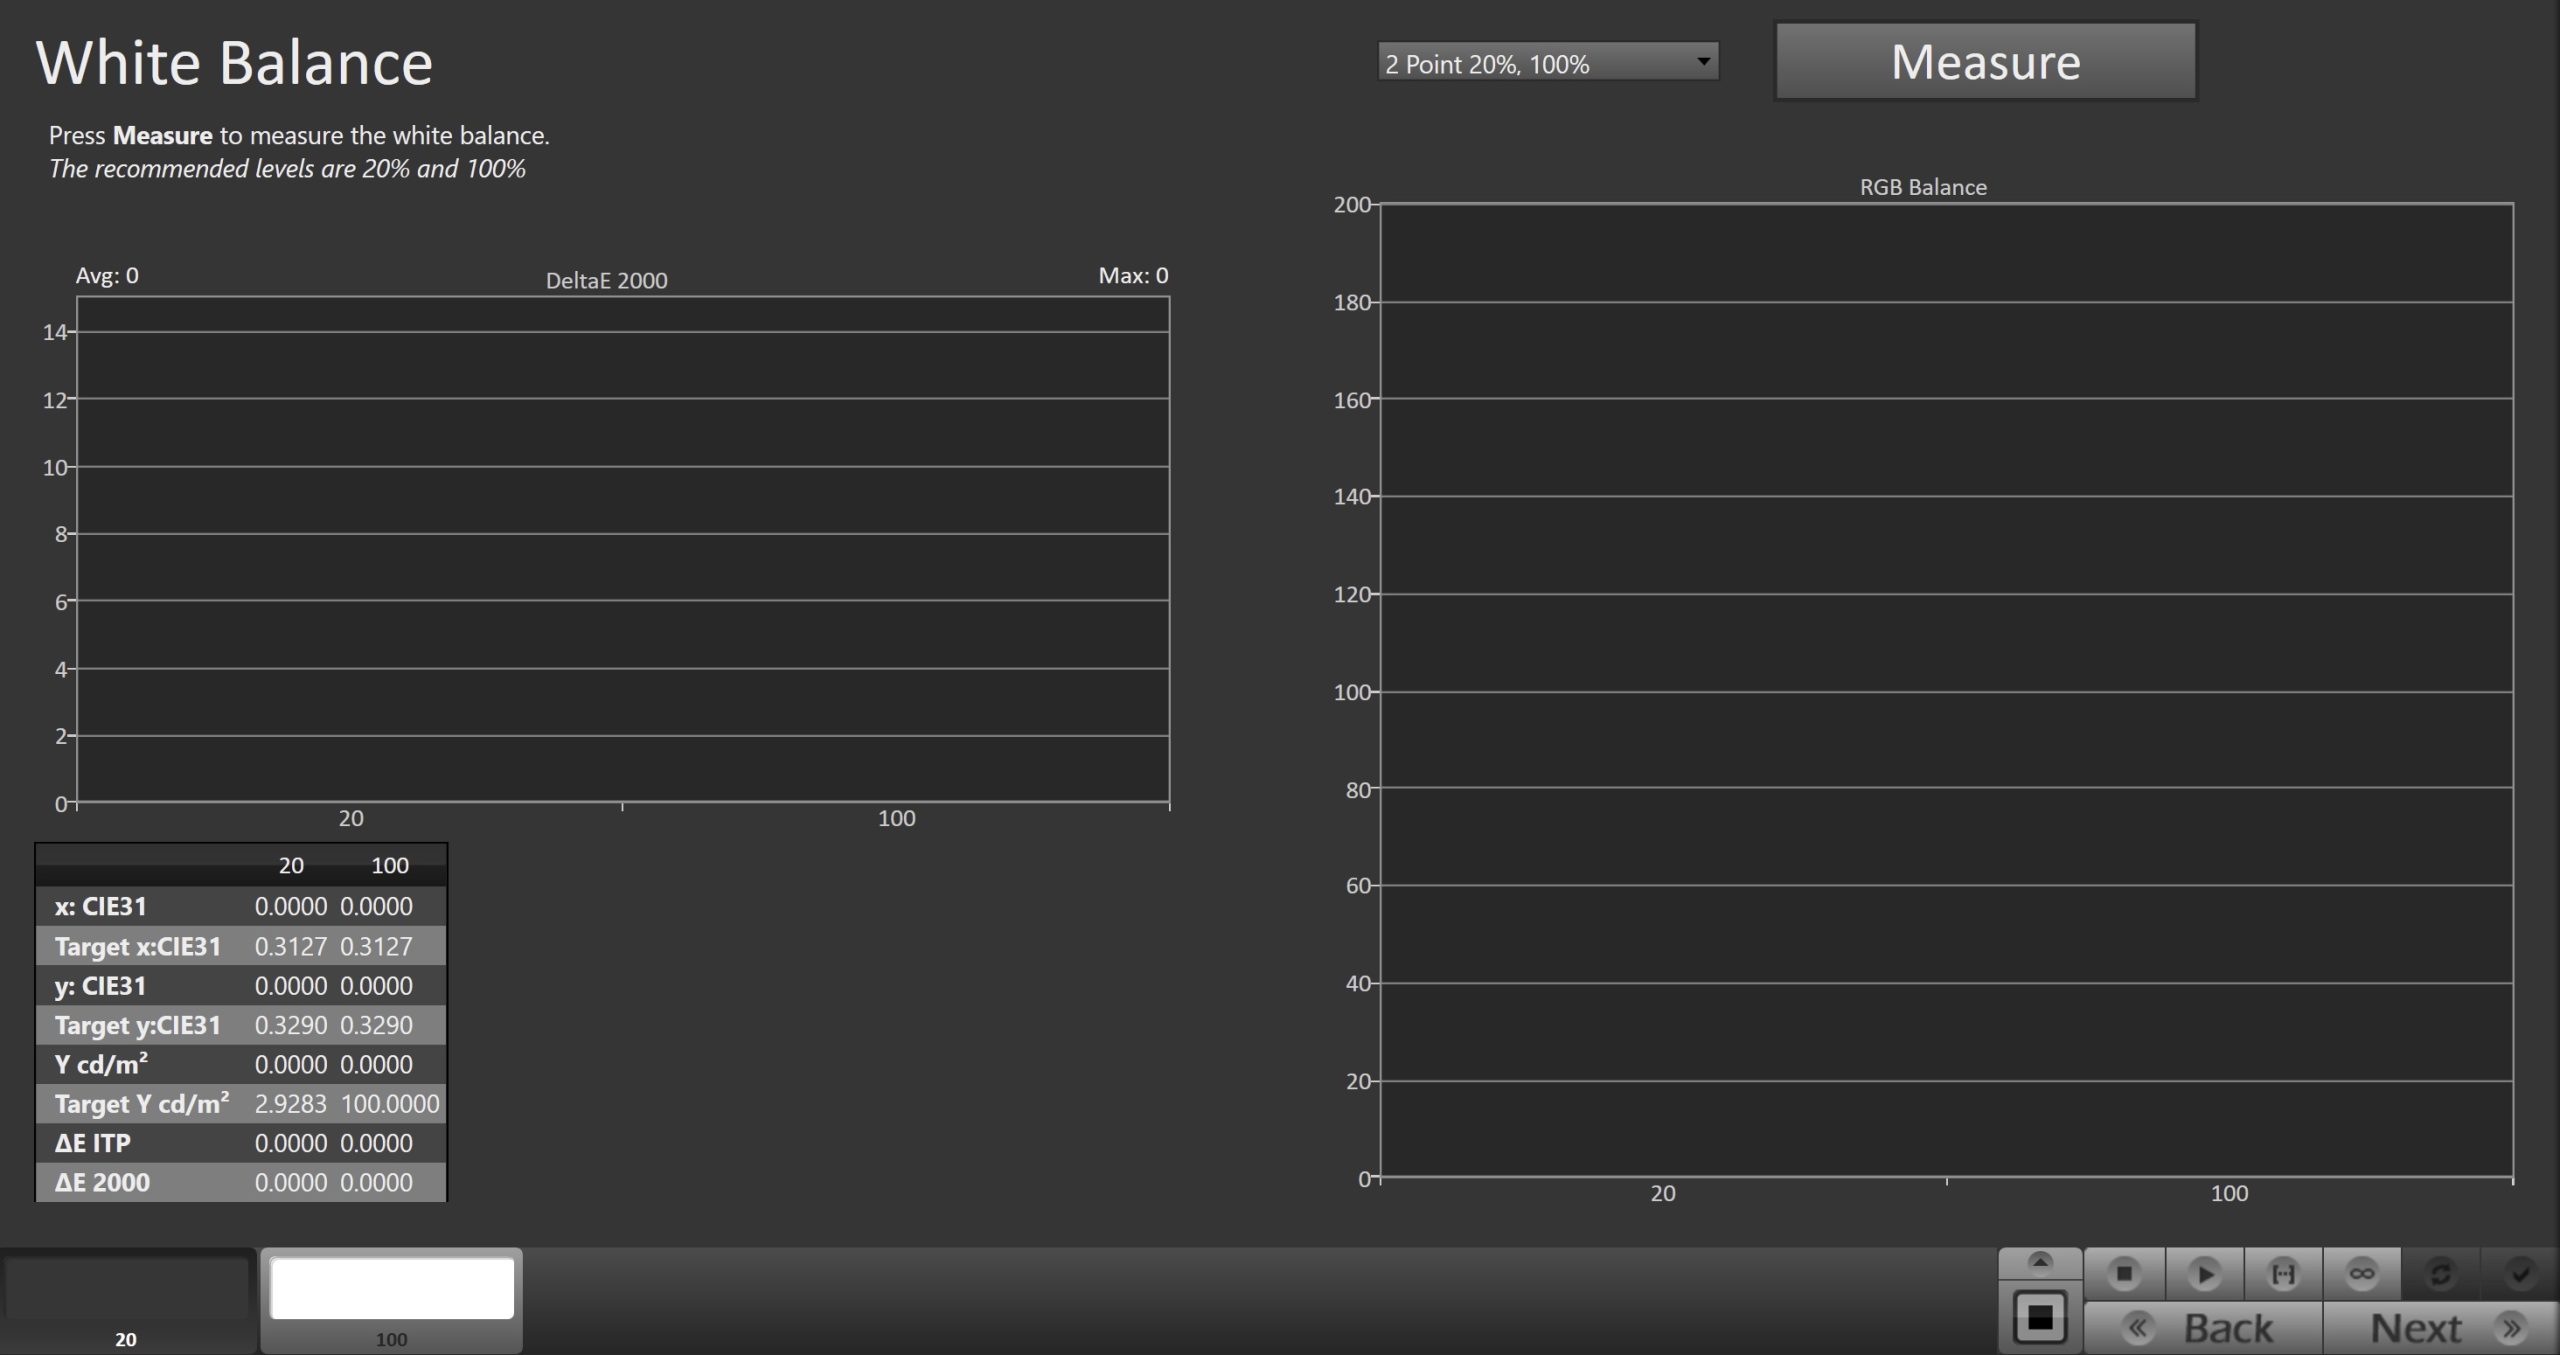
- Use the Read Continuous button to measure the higher of the two greyscale patches shown. This can be modified with the dropdown on the right
- Adjust the RGB Gain/High controls to achieve the lowest DeltaE 2000 possible (far right chart).
- If RGB Offset/Low controls are available, use the Read Continuous button to measure the 20% grayscale pattern, then adjust RGB low controls to achieve the lowest DeltaE 2000 possible (far right chart).
- Click Next to proceed
Step 4
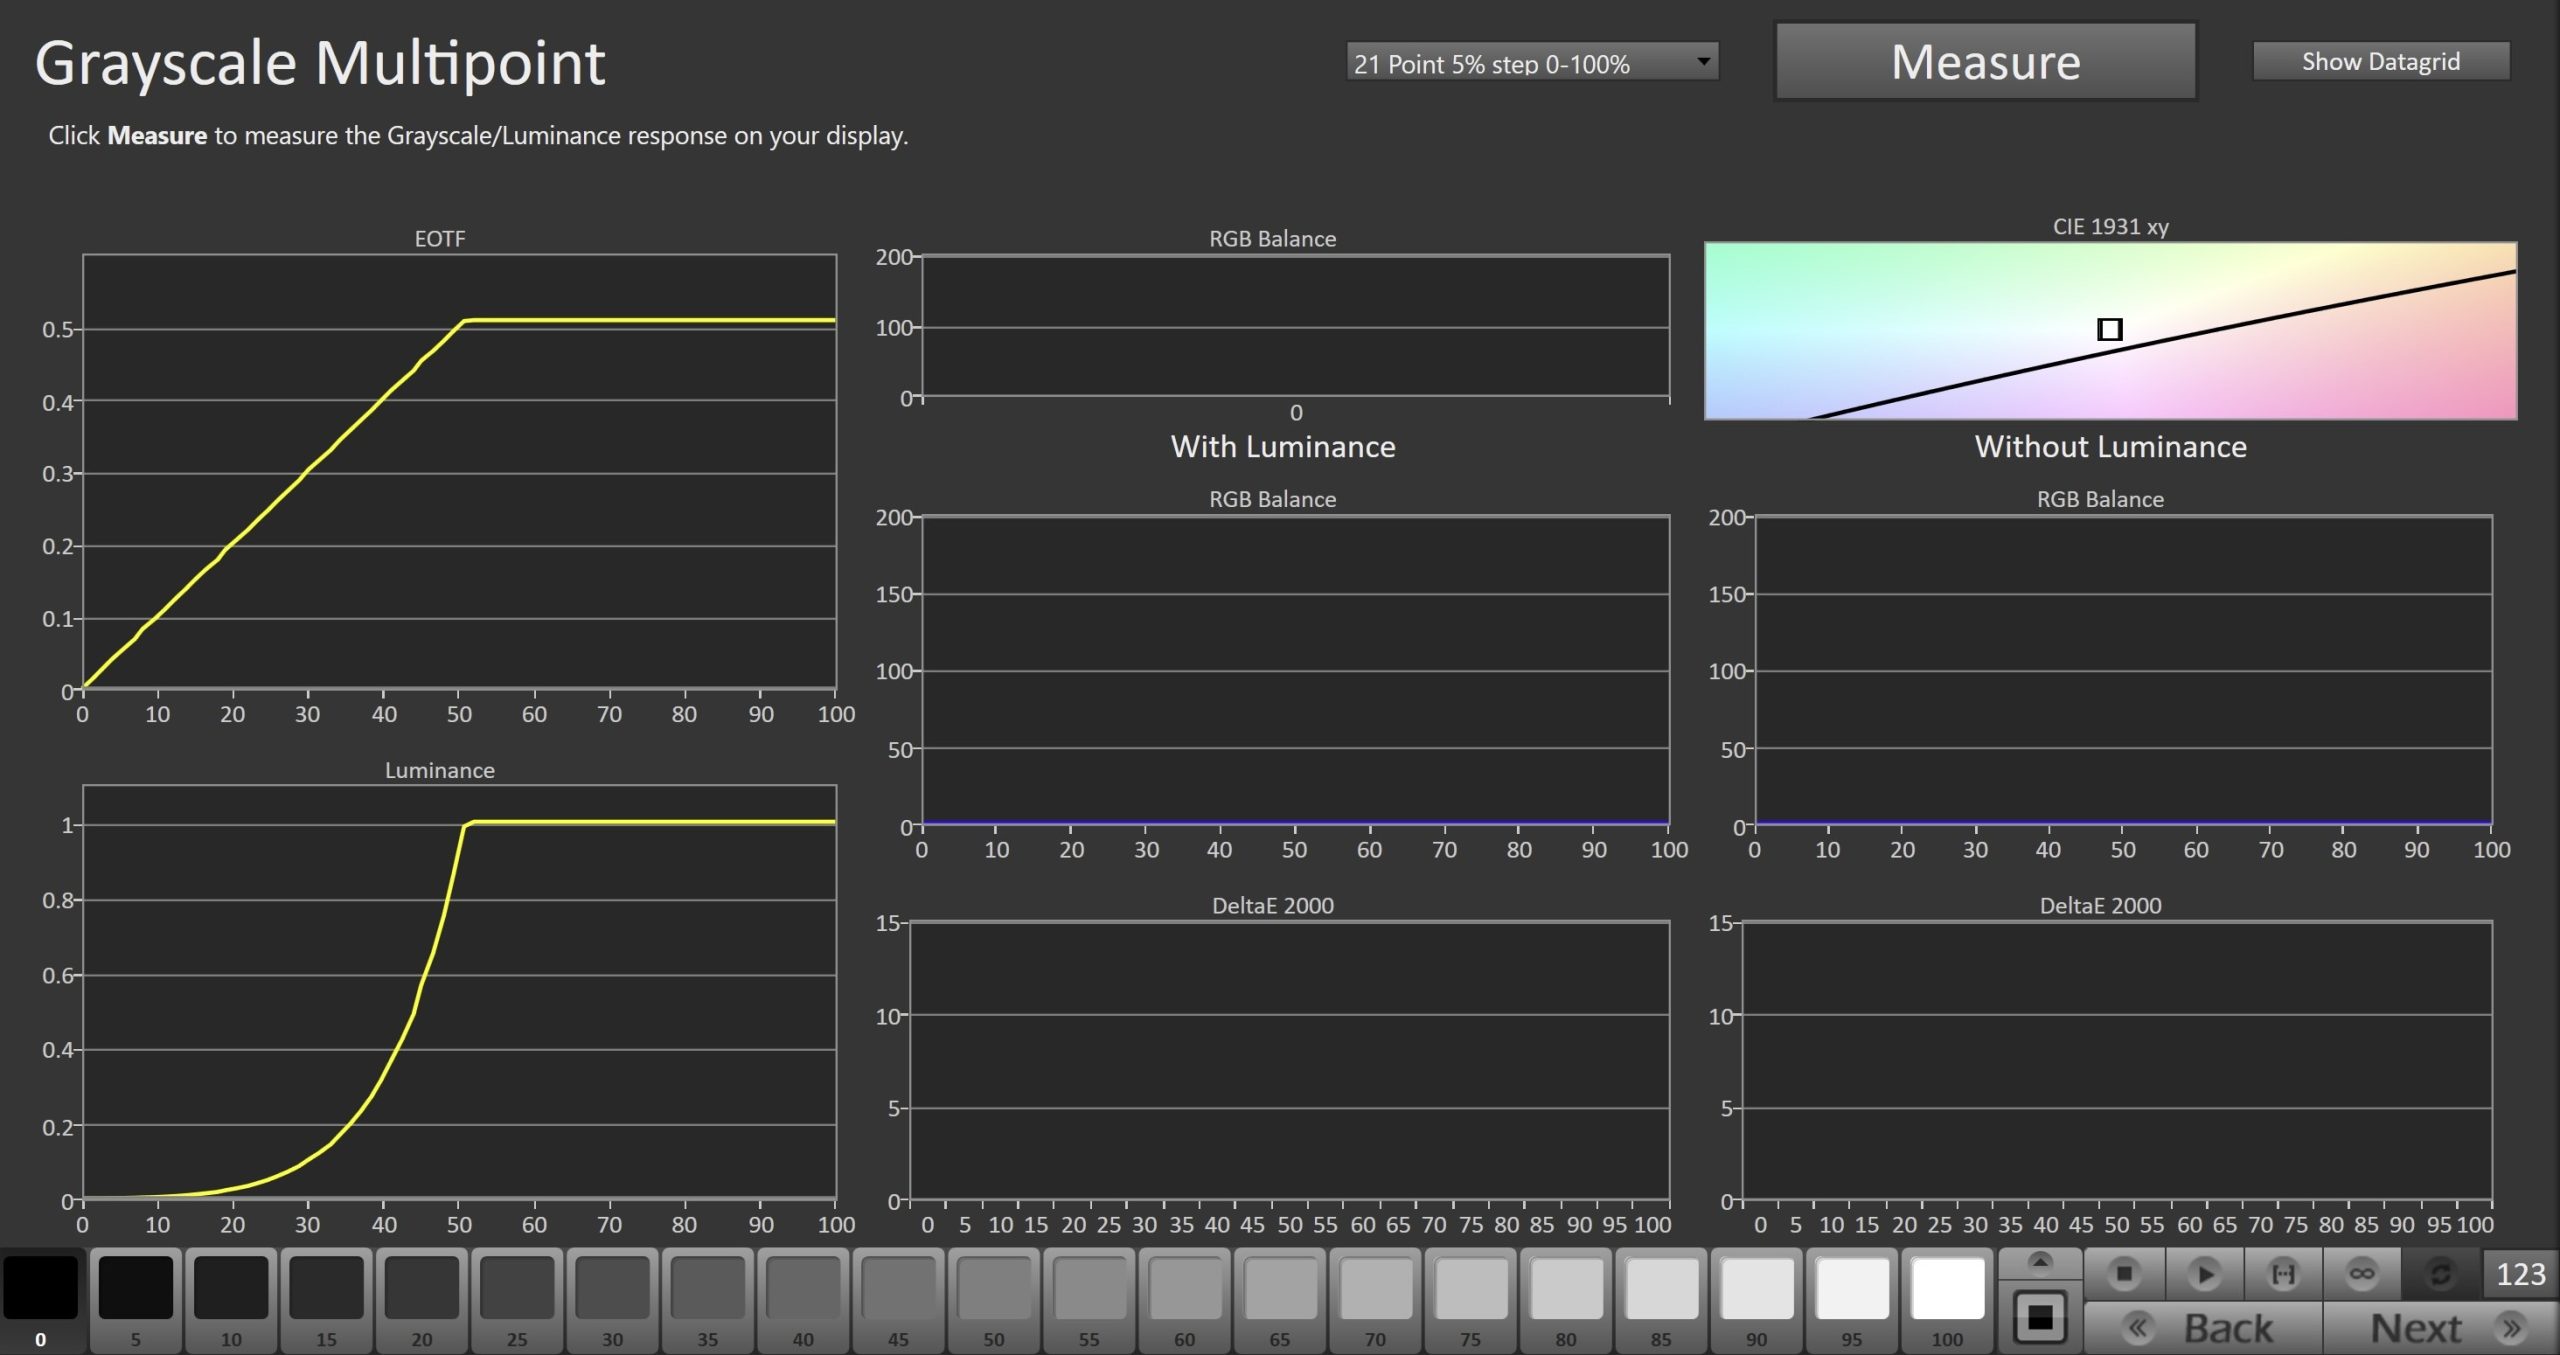
- This page will allow you to adjust the Multipoint Greyscale of your display. Not all displays or picture modes will have this option
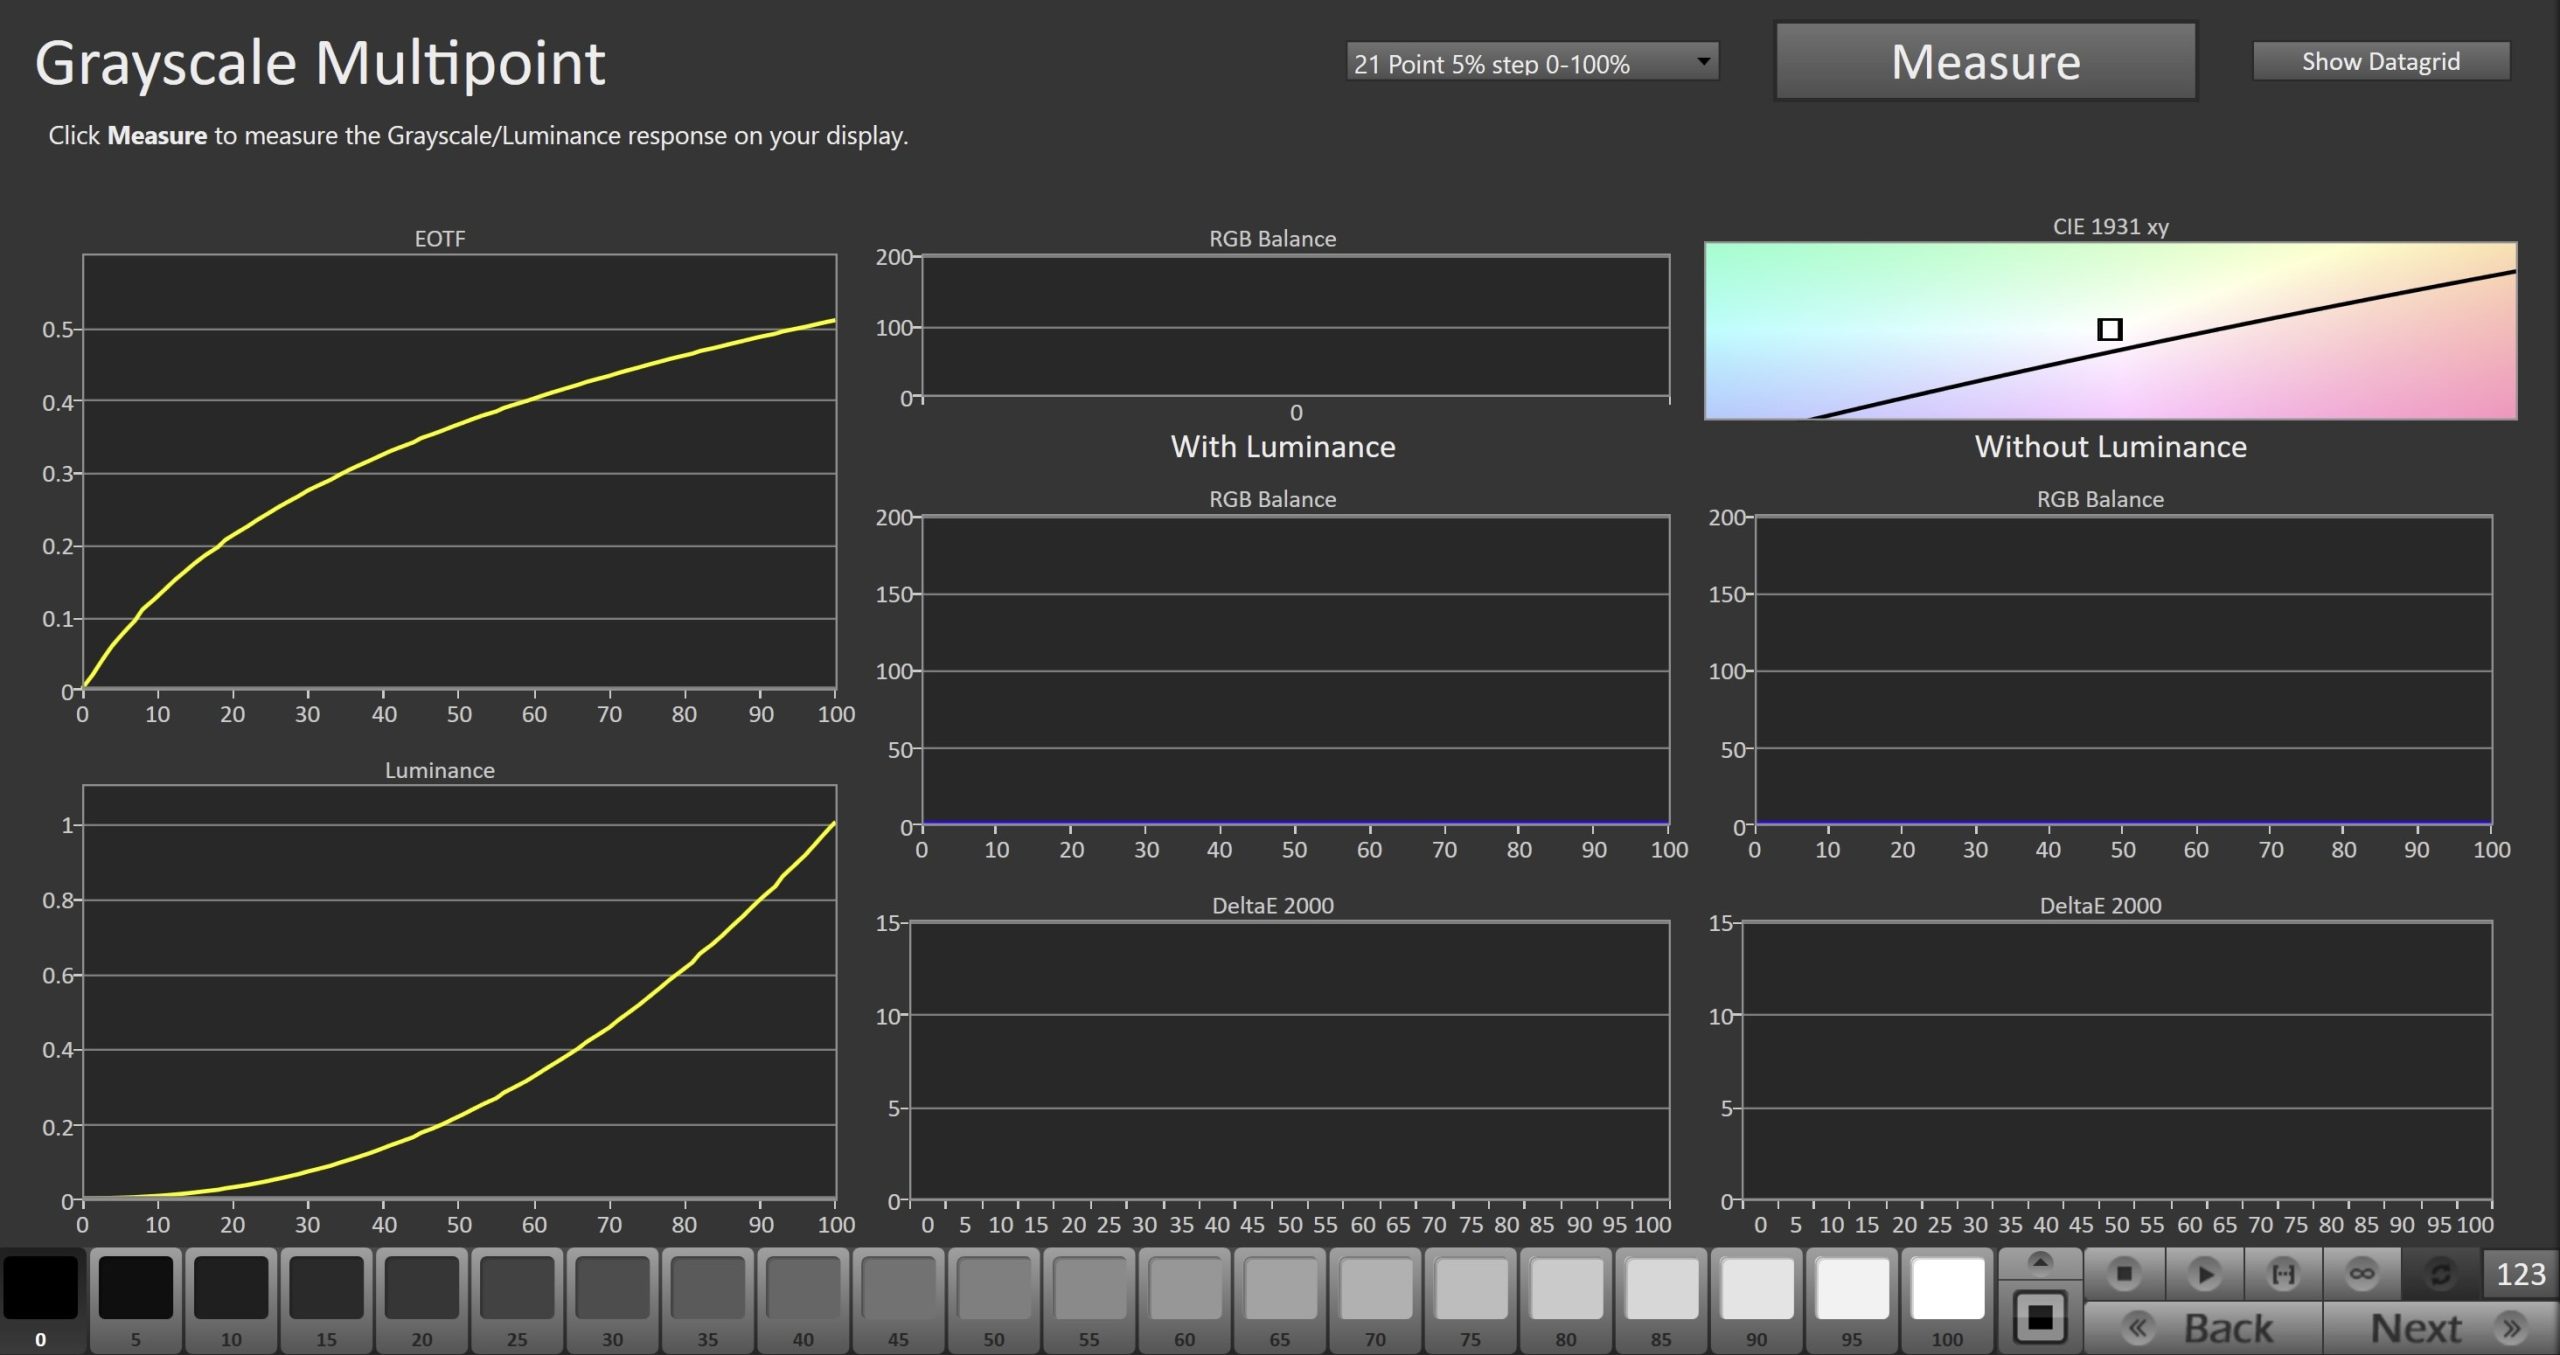
- The pattern slider at the bottom of Calman will be preloaded with a 21pt greyscale ramp from 0-100%.
- If your display uses different adjustment points you can choose an alternative ramp in the dropdown next to the Measure button
- Click the test patch you are adjusting on the display, and press the Read Continuous button to take readings as you adjust your display
- Once complete, click Next to proceed
Step 5
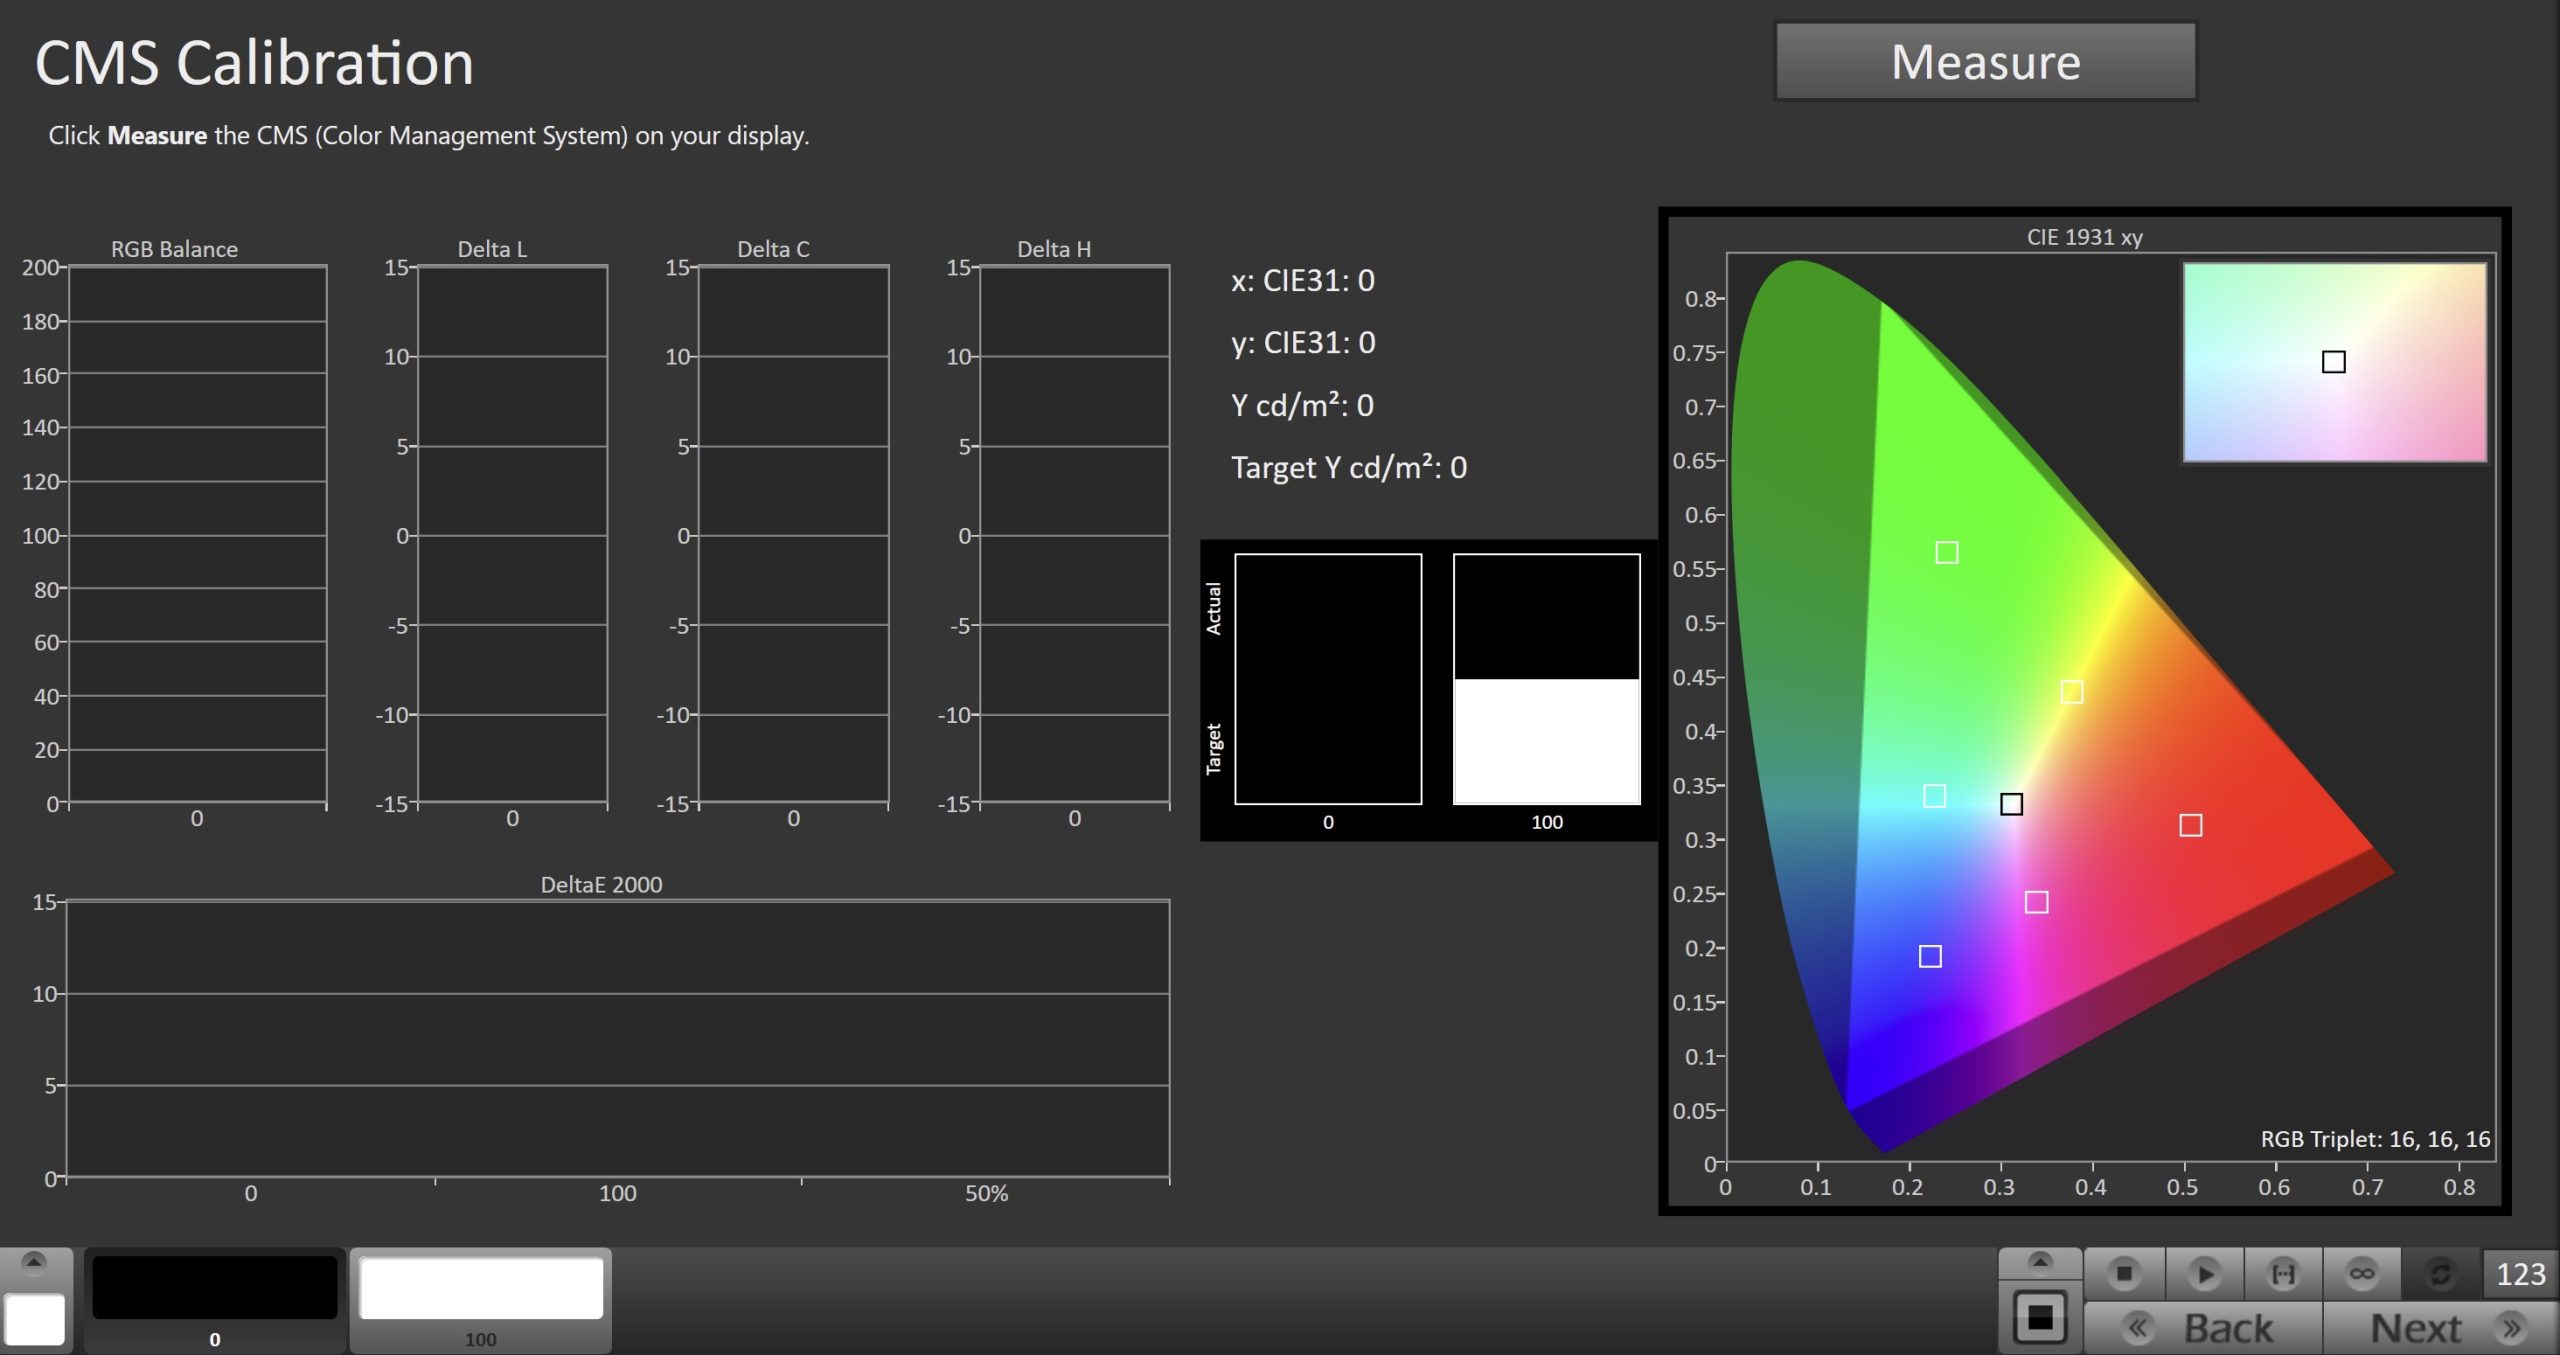
- This page will allow you to adjust the Colorspace/CMS controls on your display

- Click the test patch you are adjusting on the display, and press the Read Continuous button to take readings as you adjust your display
- Press the Stop button before moving to the next test patch
- Once complete, click Next to proceed to SDR Validation
SDR Validation
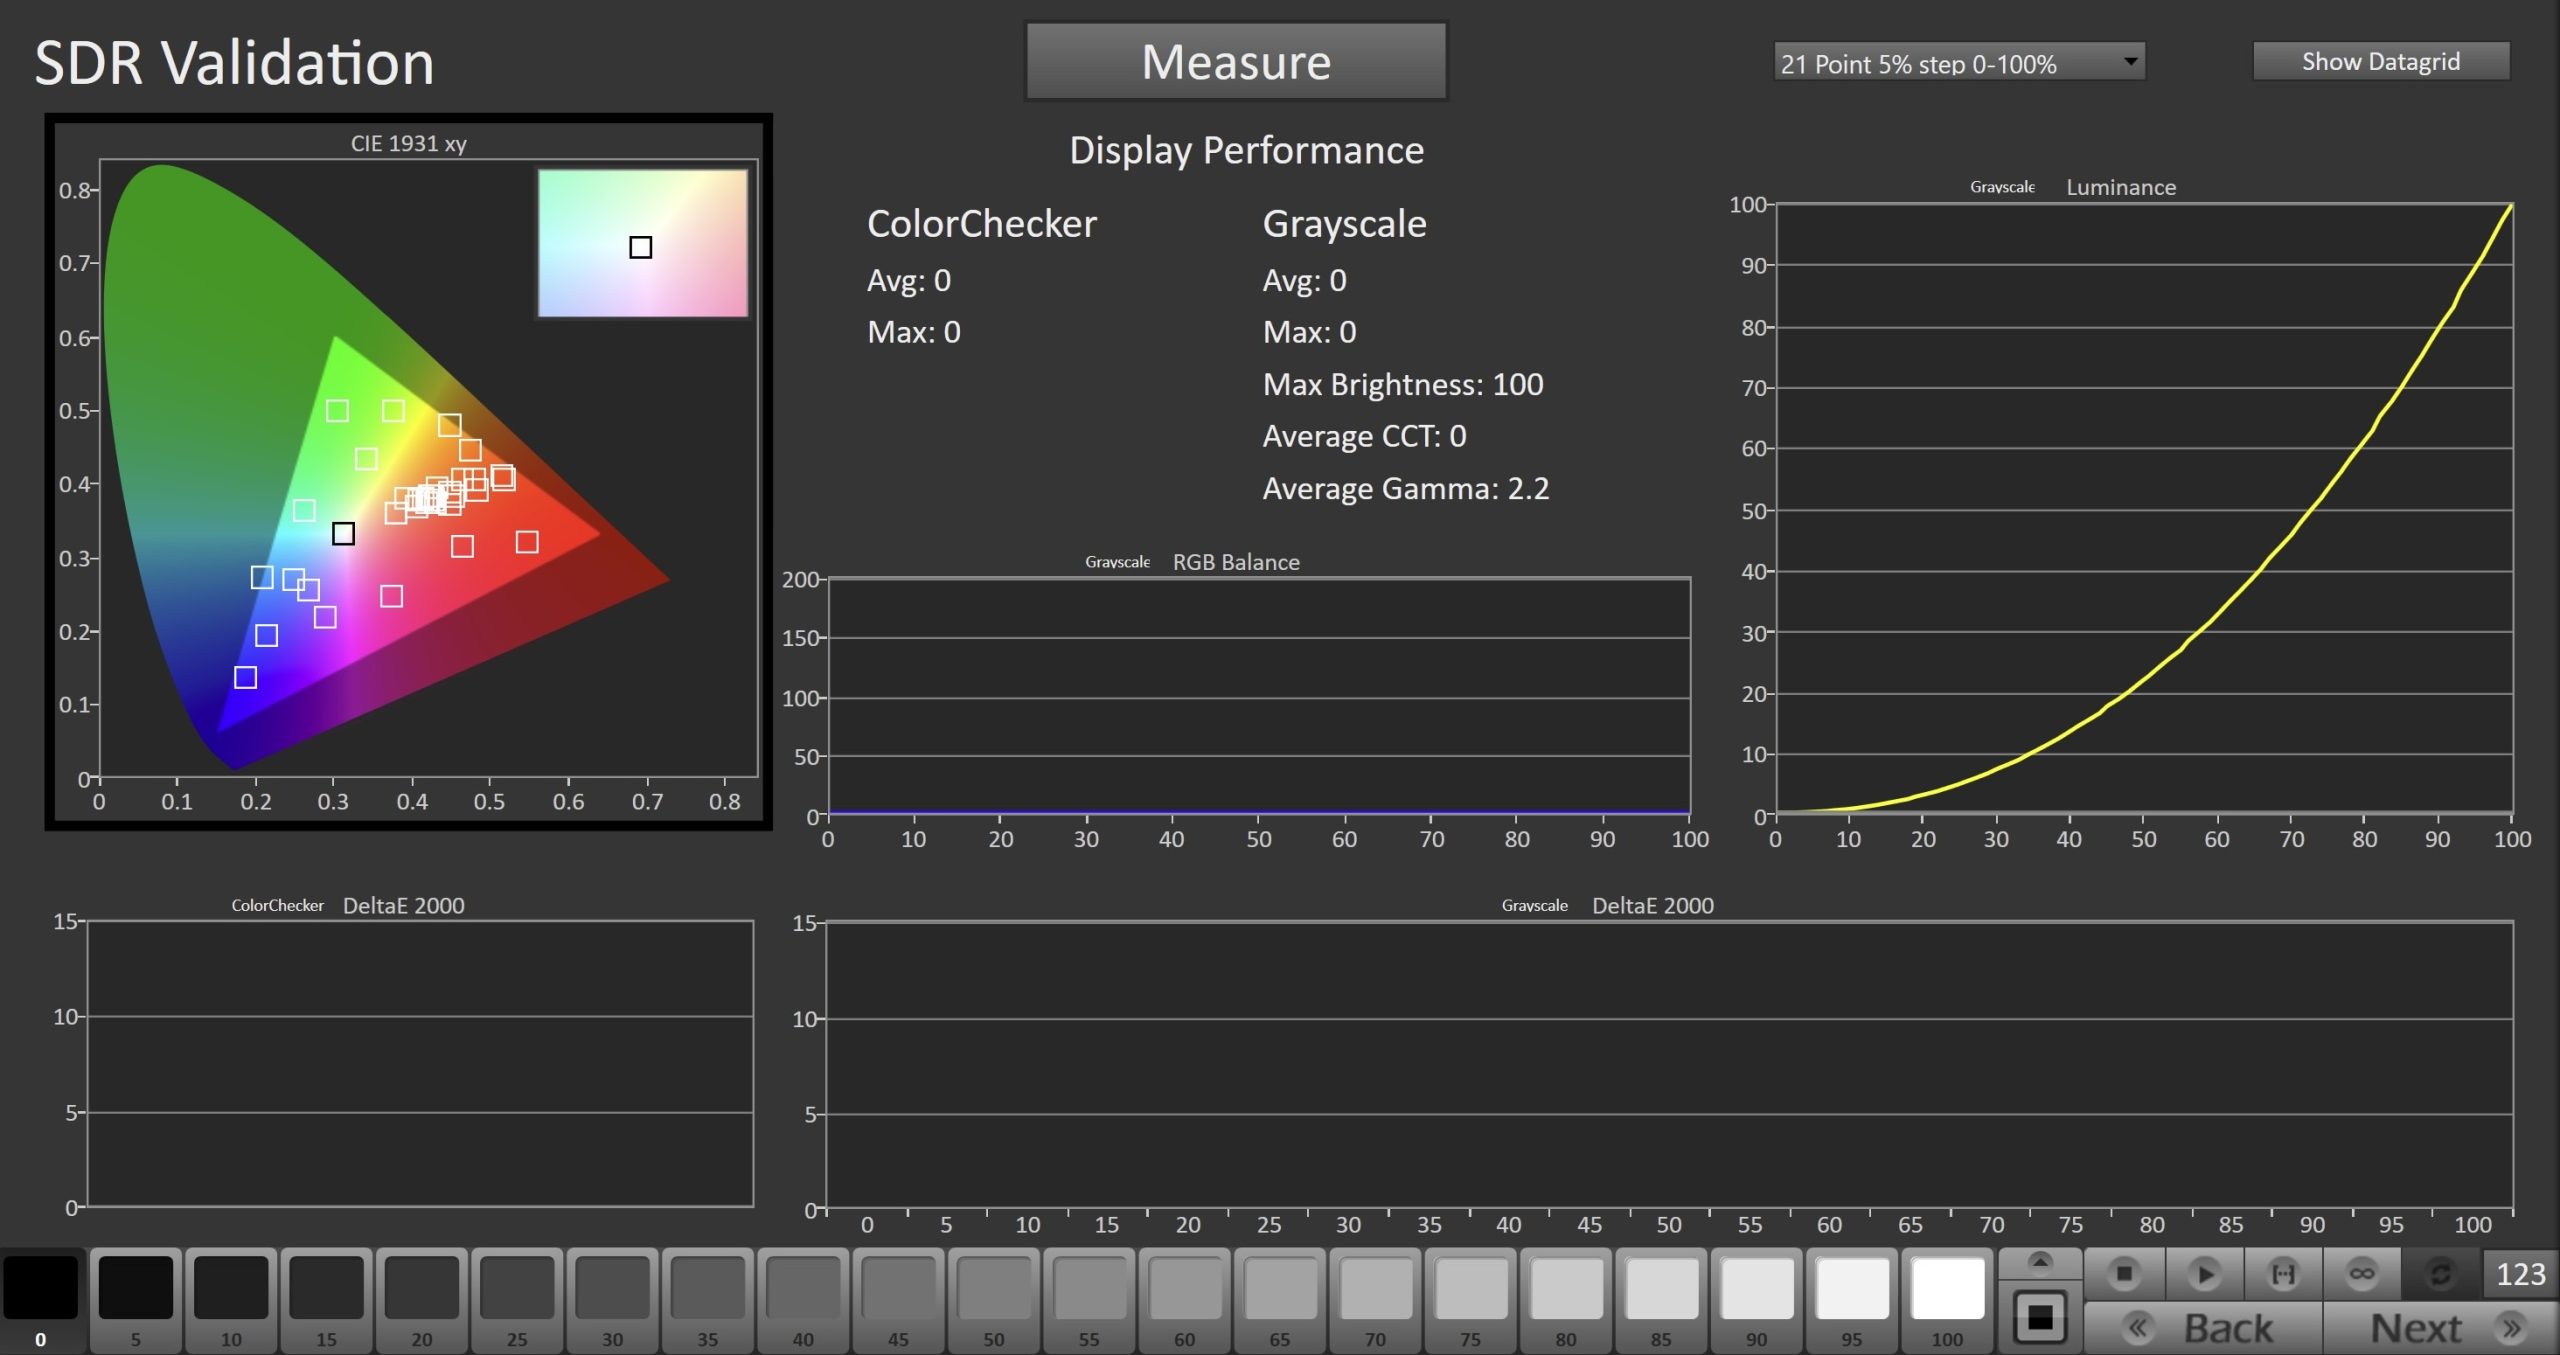
- To take SDR Validation measurements, click the Measure button to measure the display’s grayscale and ColorChecker response
HDR Calibration
Step 1
- In this step, you’ll take measurements of the display before the calibration. These will be used to compare the calibration results.
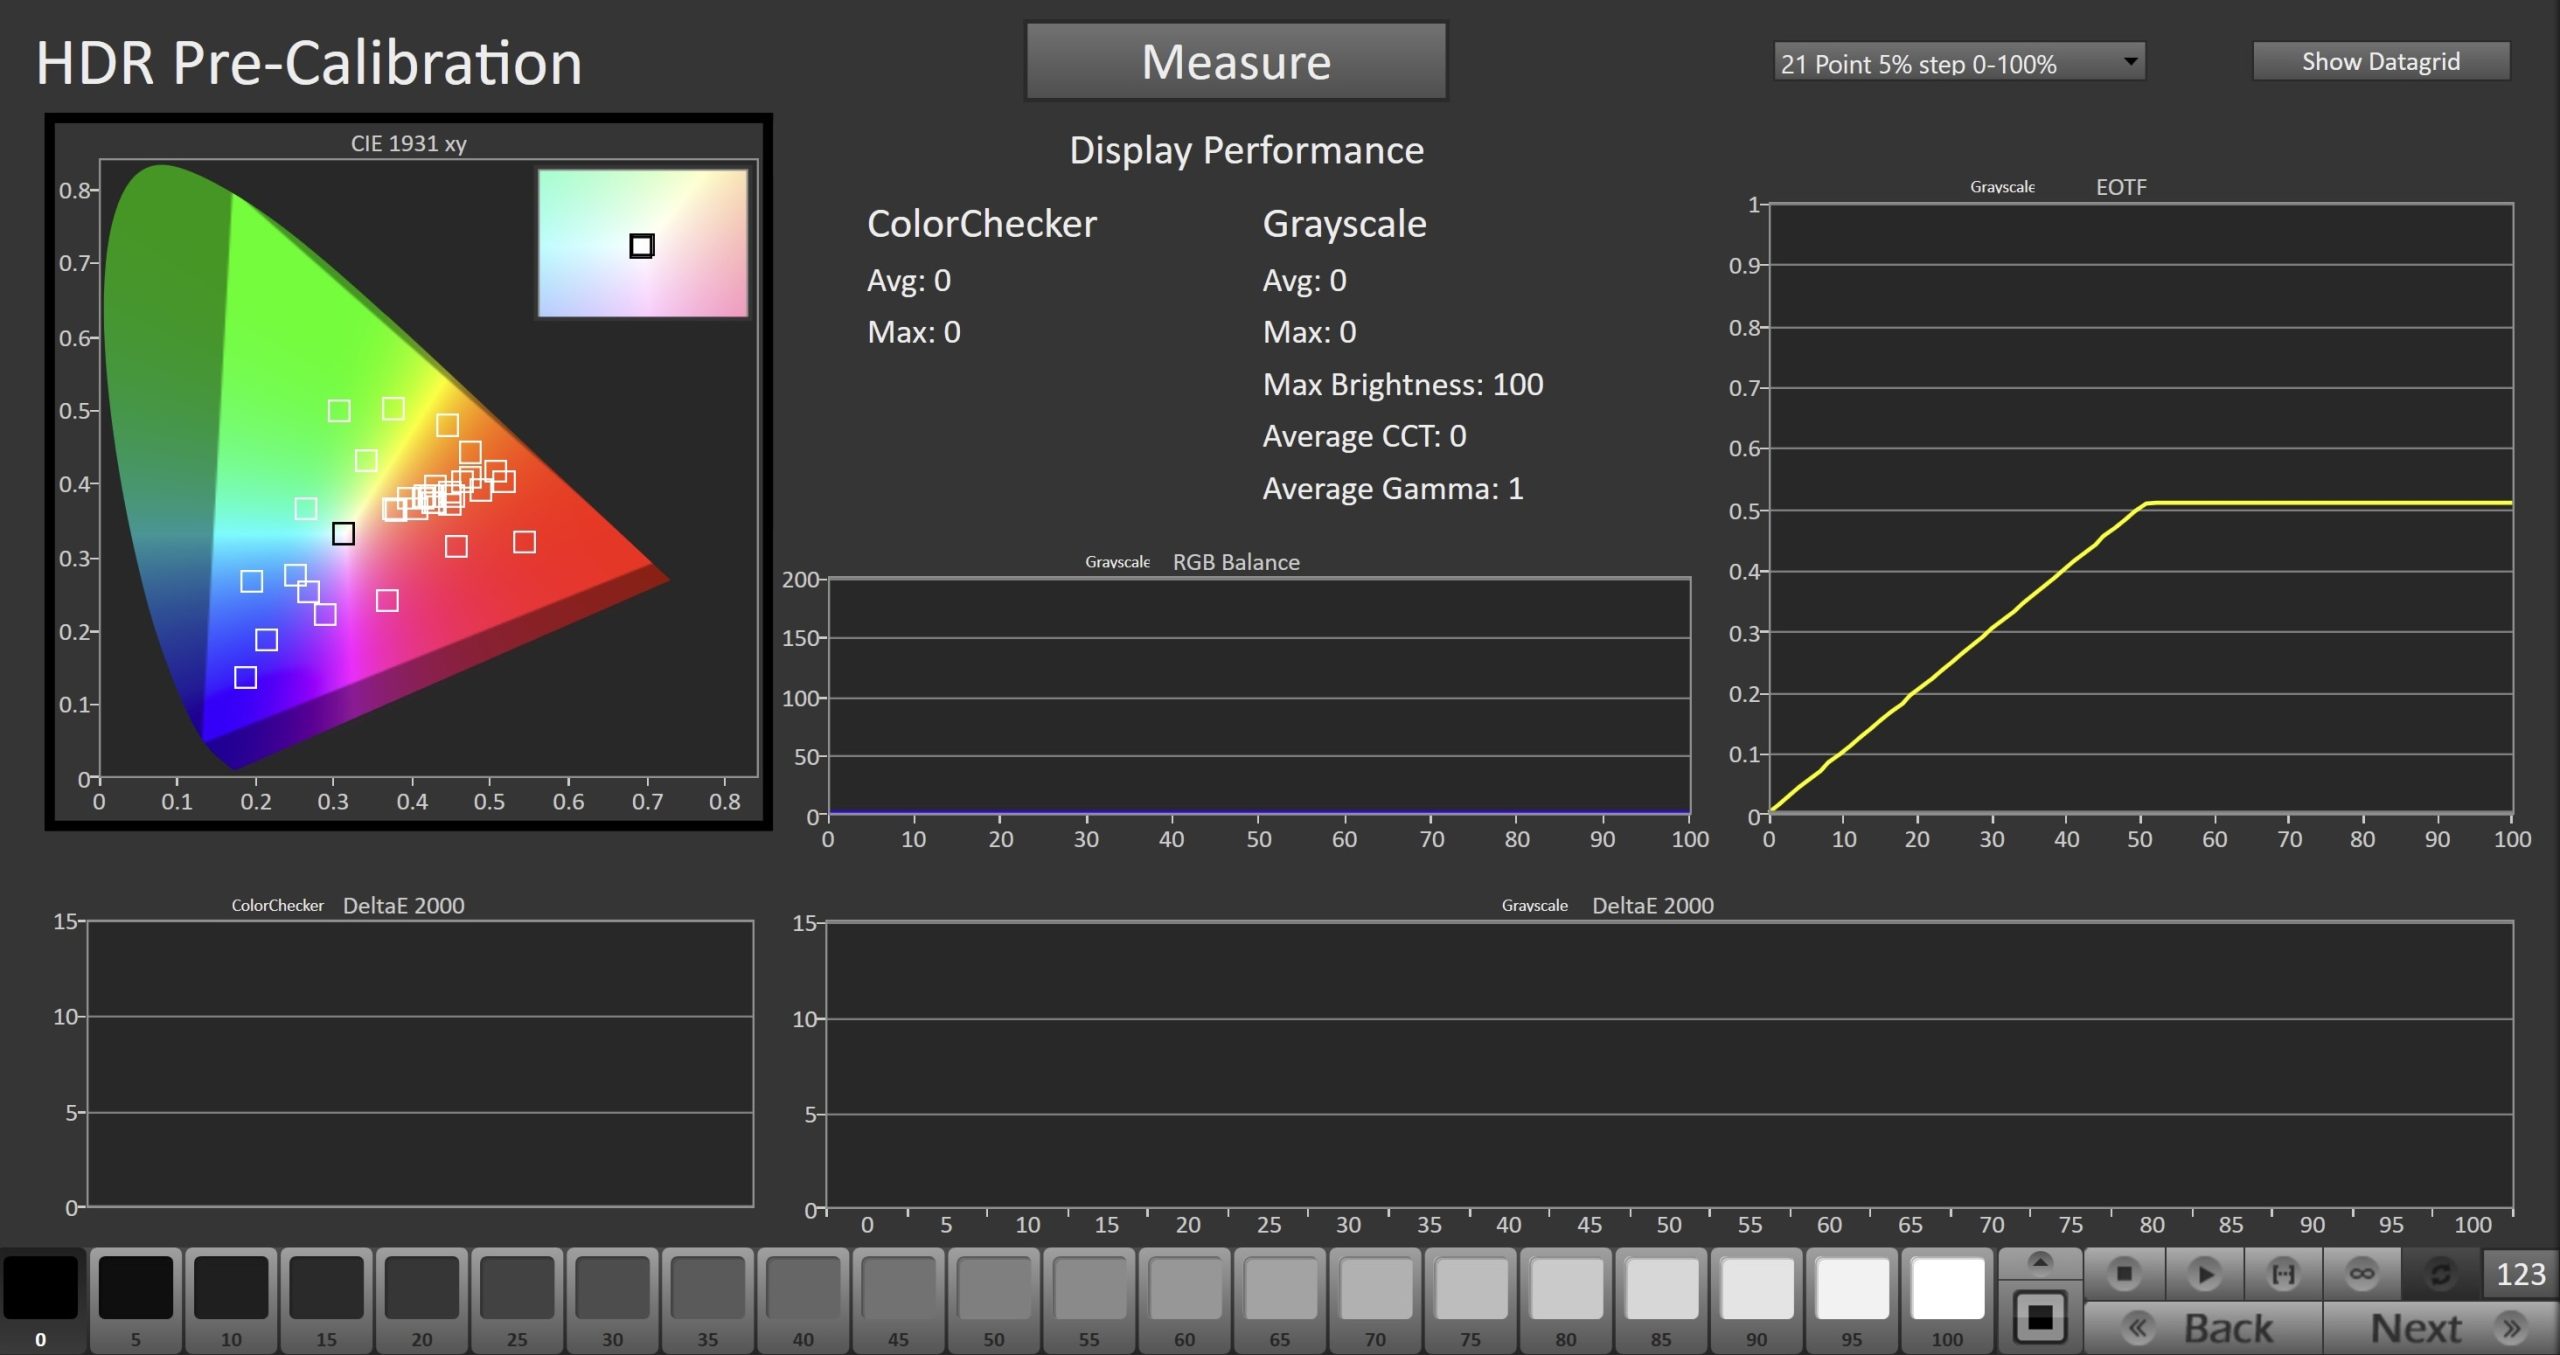
- To take Pre-Calibration Measurements, click the Measure button to measure the display’s grayscale and ColorChecker response
- This will provide a point of reference to compare the calibration results
- Click Next to proceed
Step 2
- On this page, you’ll be able to adjust your display’s White Balance, or 2 point greyscale. The default points (20/100) are appropriate for most displays, but you can choose alternate points if your display adjusts greyscale at different points.
- Use the Read Continuous button to measure the higher of the two greyscale patches shown. This can be modified with the dropdown on the right
- Adjust the RGB Gain/High controls to achieve the lowest DeltaE 2000 possible (far right chart).
- If RGB Offset/Low controls are available, use the Read Continuous button to measure the 20% grayscale pattern, then adjust RGB low controls to achieve the lowest DeltaE 2000 possible (far right chart).
- Click Next to proceed
Step 3
- This page will allow you to adjust the Multipoint Greyscale of your display. Not all displays or picture modes will have this option
- The pattern slider at the bottom of Calman will be preloaded with a 21pt greyscale ramp from 0-100%.
- If your display uses different adjustment points you can choose an alternative ramp in the dropdown next to the Measure button
- Click the test patch you are adjusting on the display, and press the Read Continuous button to take readings as you adjust your display
- Once complete, click Next to proceed
Step 4
- This page will allow you to adjust the Colorspace/CMS controls on your display
- Click the test patch you are adjusting on the display, and press the Read Continuous button to take readings as you adjust your display
- Press the Stop button before moving to the next test patch
- Once complete, click Next to proceed to HDR Validation
HDR Validation
Peak Luminance
Portrait Displays does not guarantee that all pattern generators will support this feature correctly. Suggested pattern generators are the Portrait VideoForge Pro or the Portrait G1.
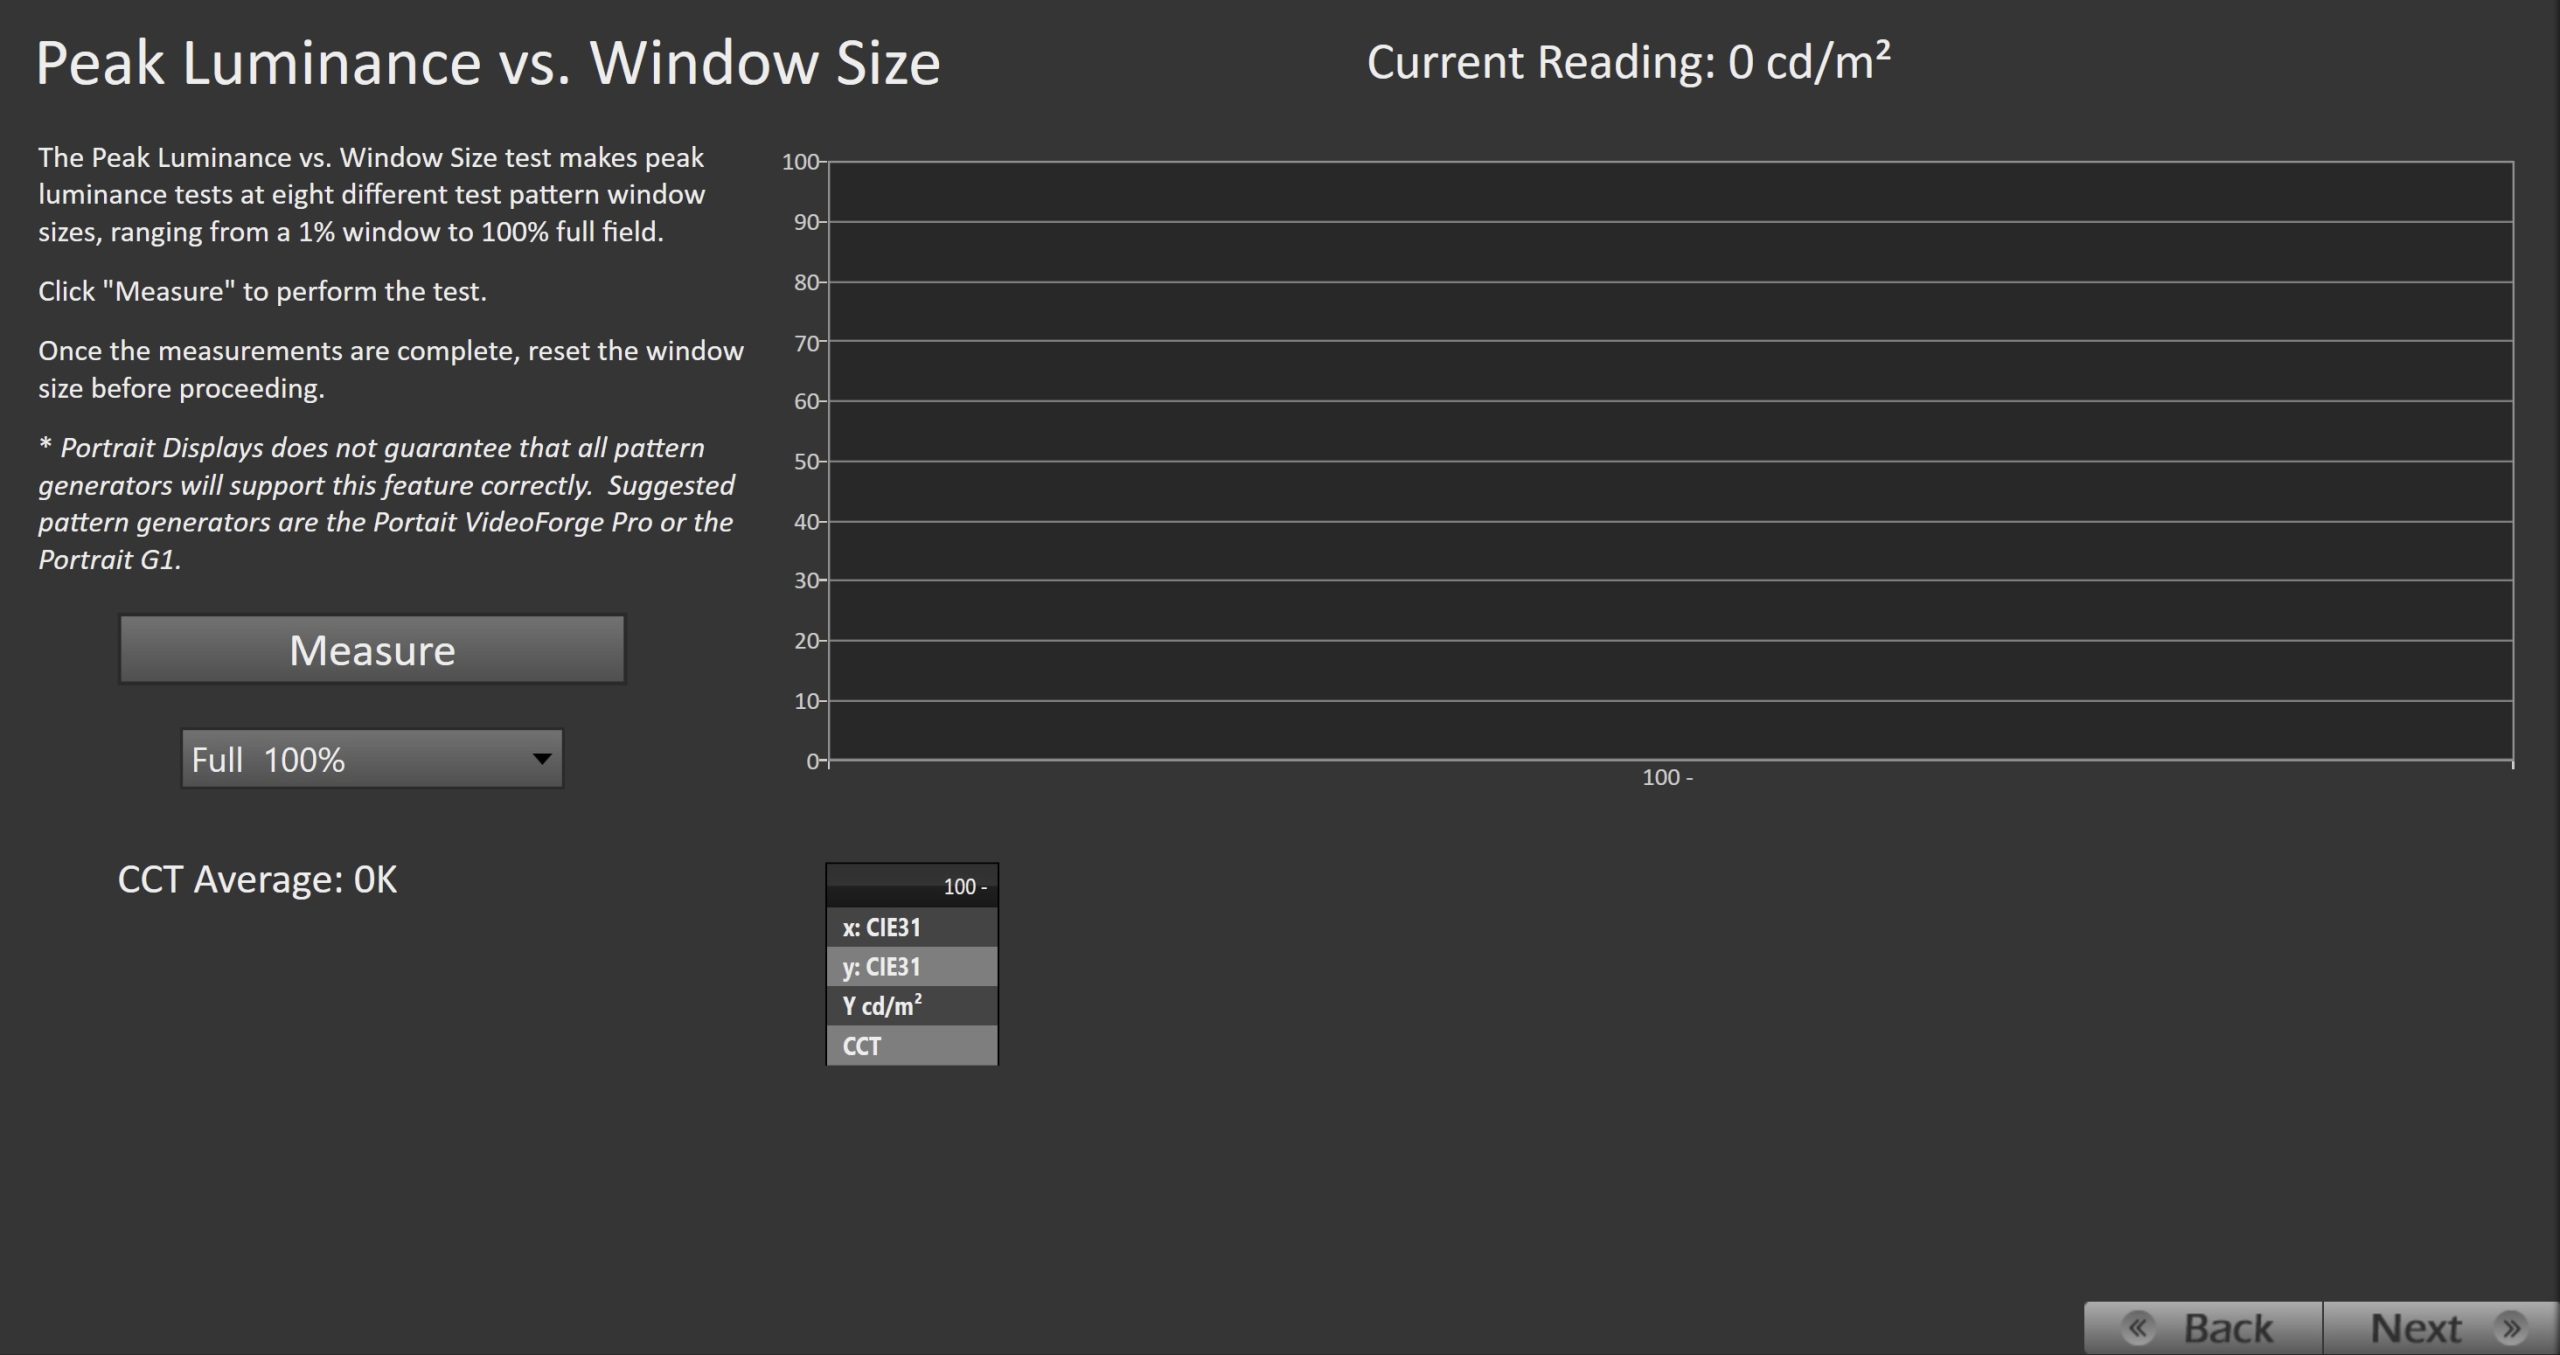
- The Peak Luminance vs. Window Size test makes peak luminance measurements at eight different test pattern window sizes, ranging from a 1% window to 100% full field, to help determine a displays capability with varying HDR content.
- Click Measure to perform the test.
- Once the measurements are complete, reset the window size before proceeding.
Grayscale
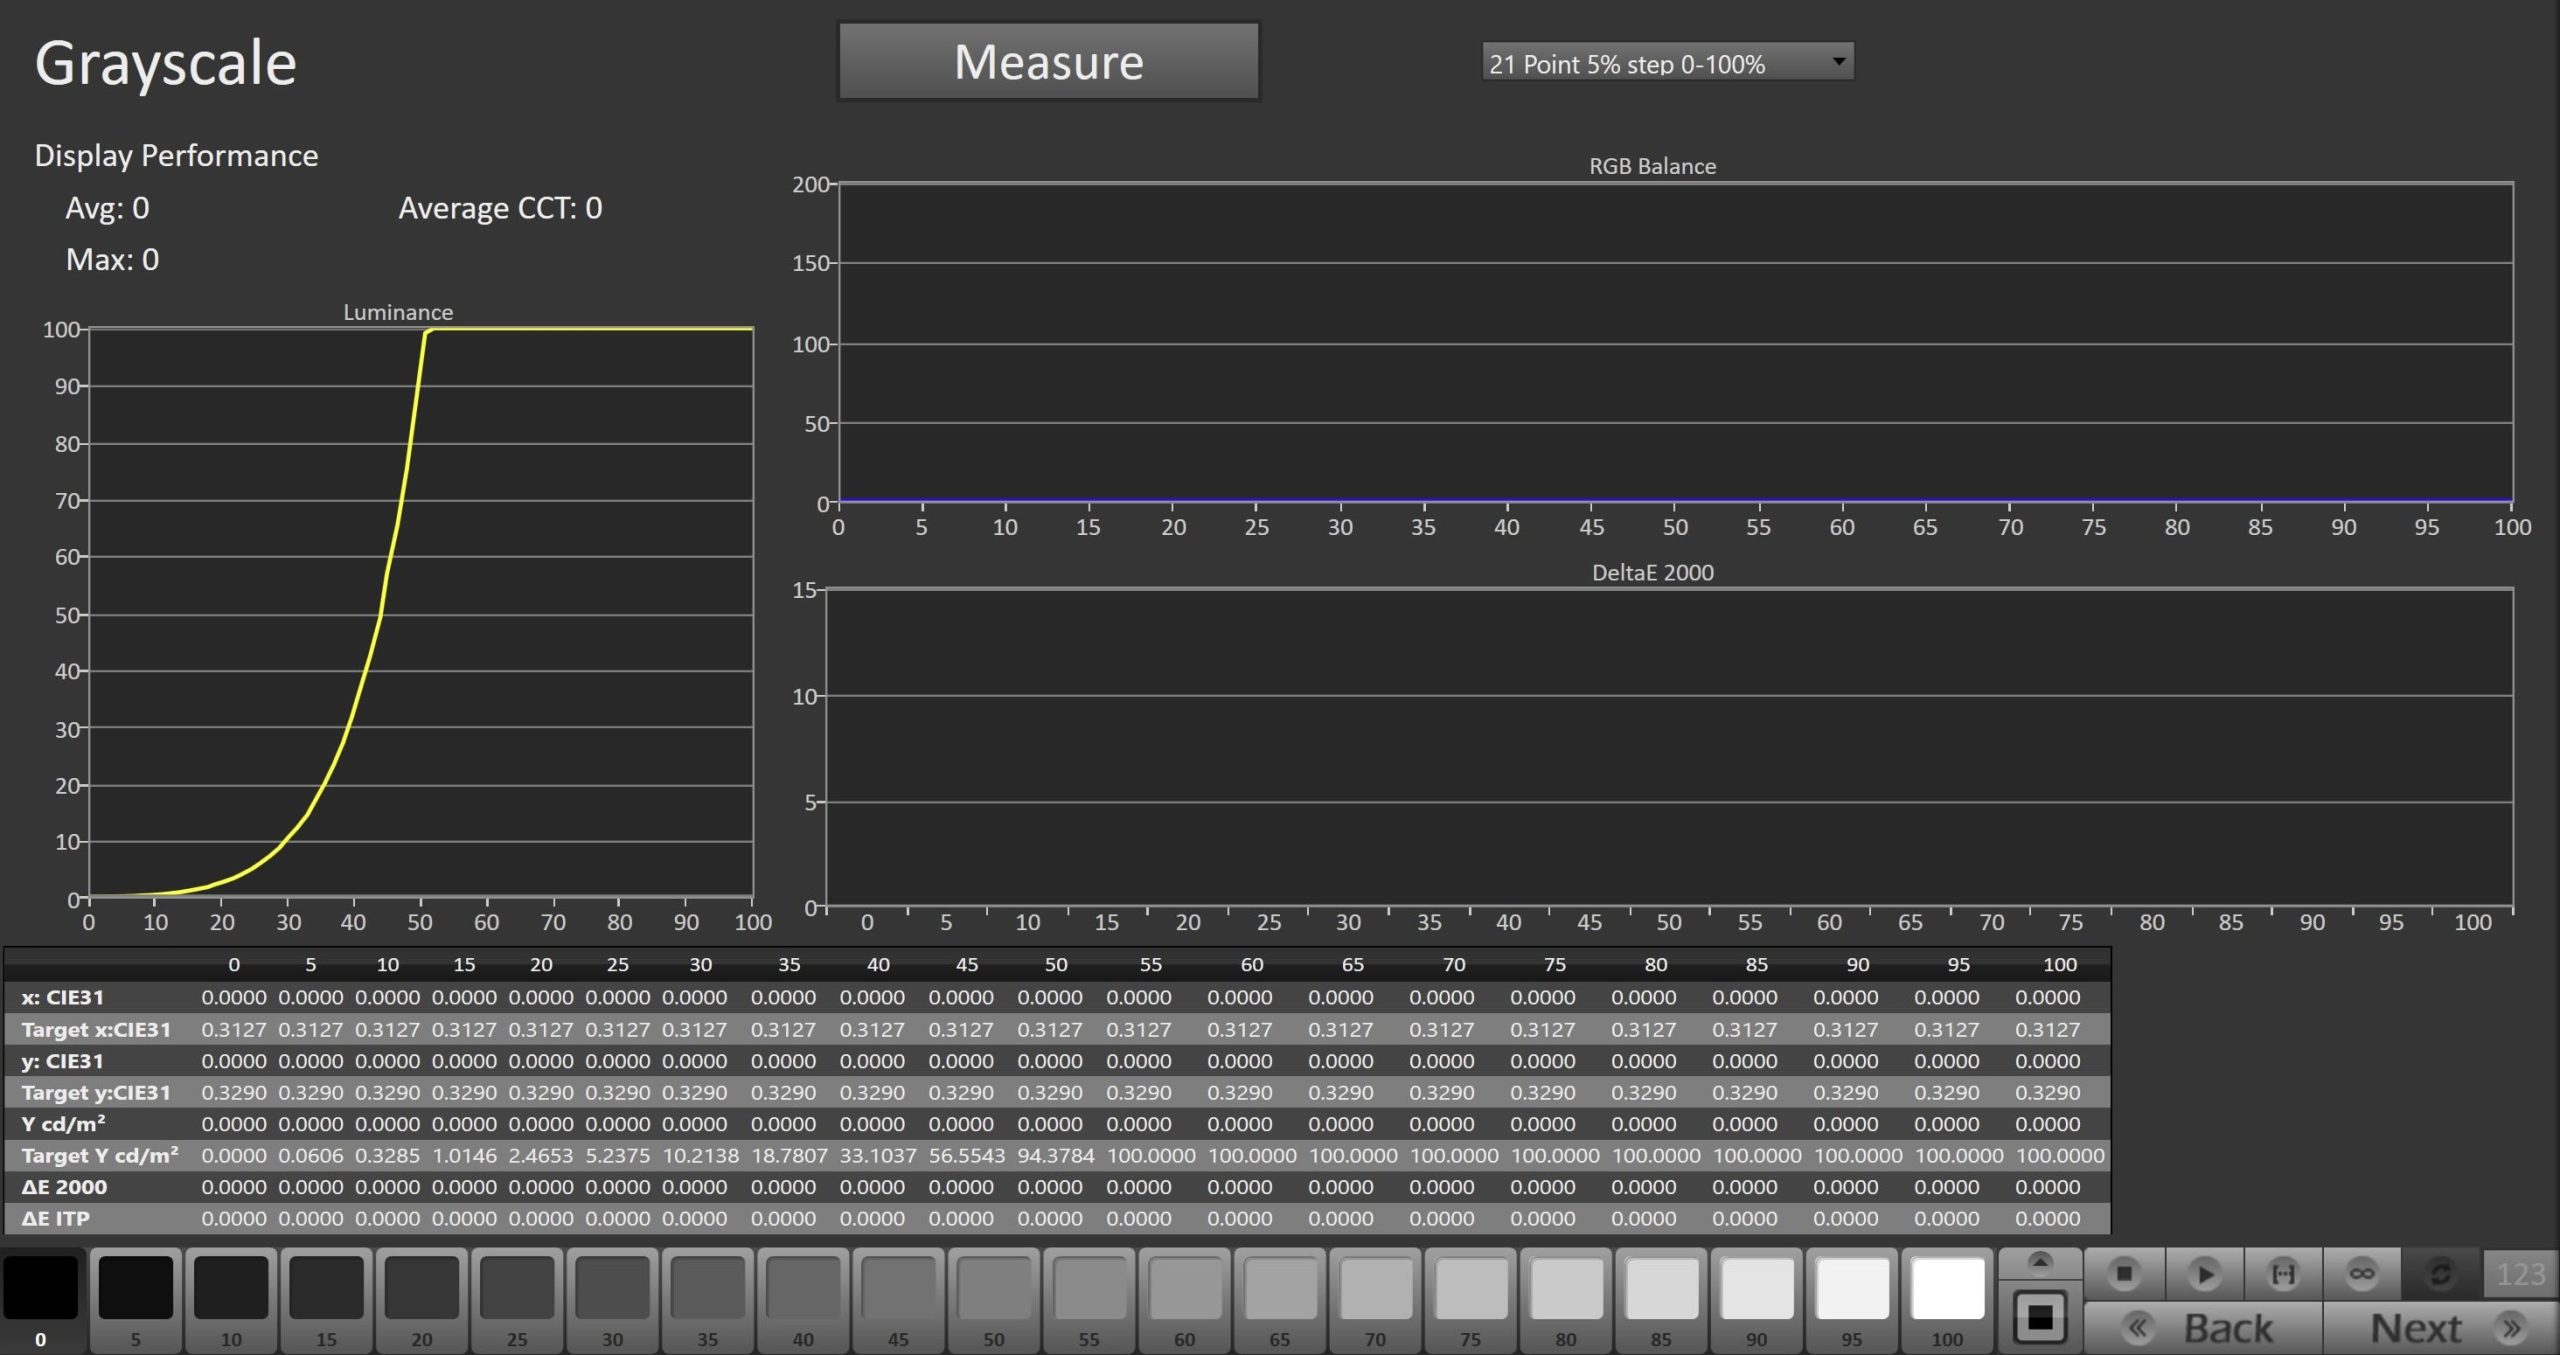
- Click the Measure button to measure the display’s grayscale
ColorChecker®

- Click the Measure button to measure the display’s CMS response using the X-Rite ColorChecker patch set
ColorMatch
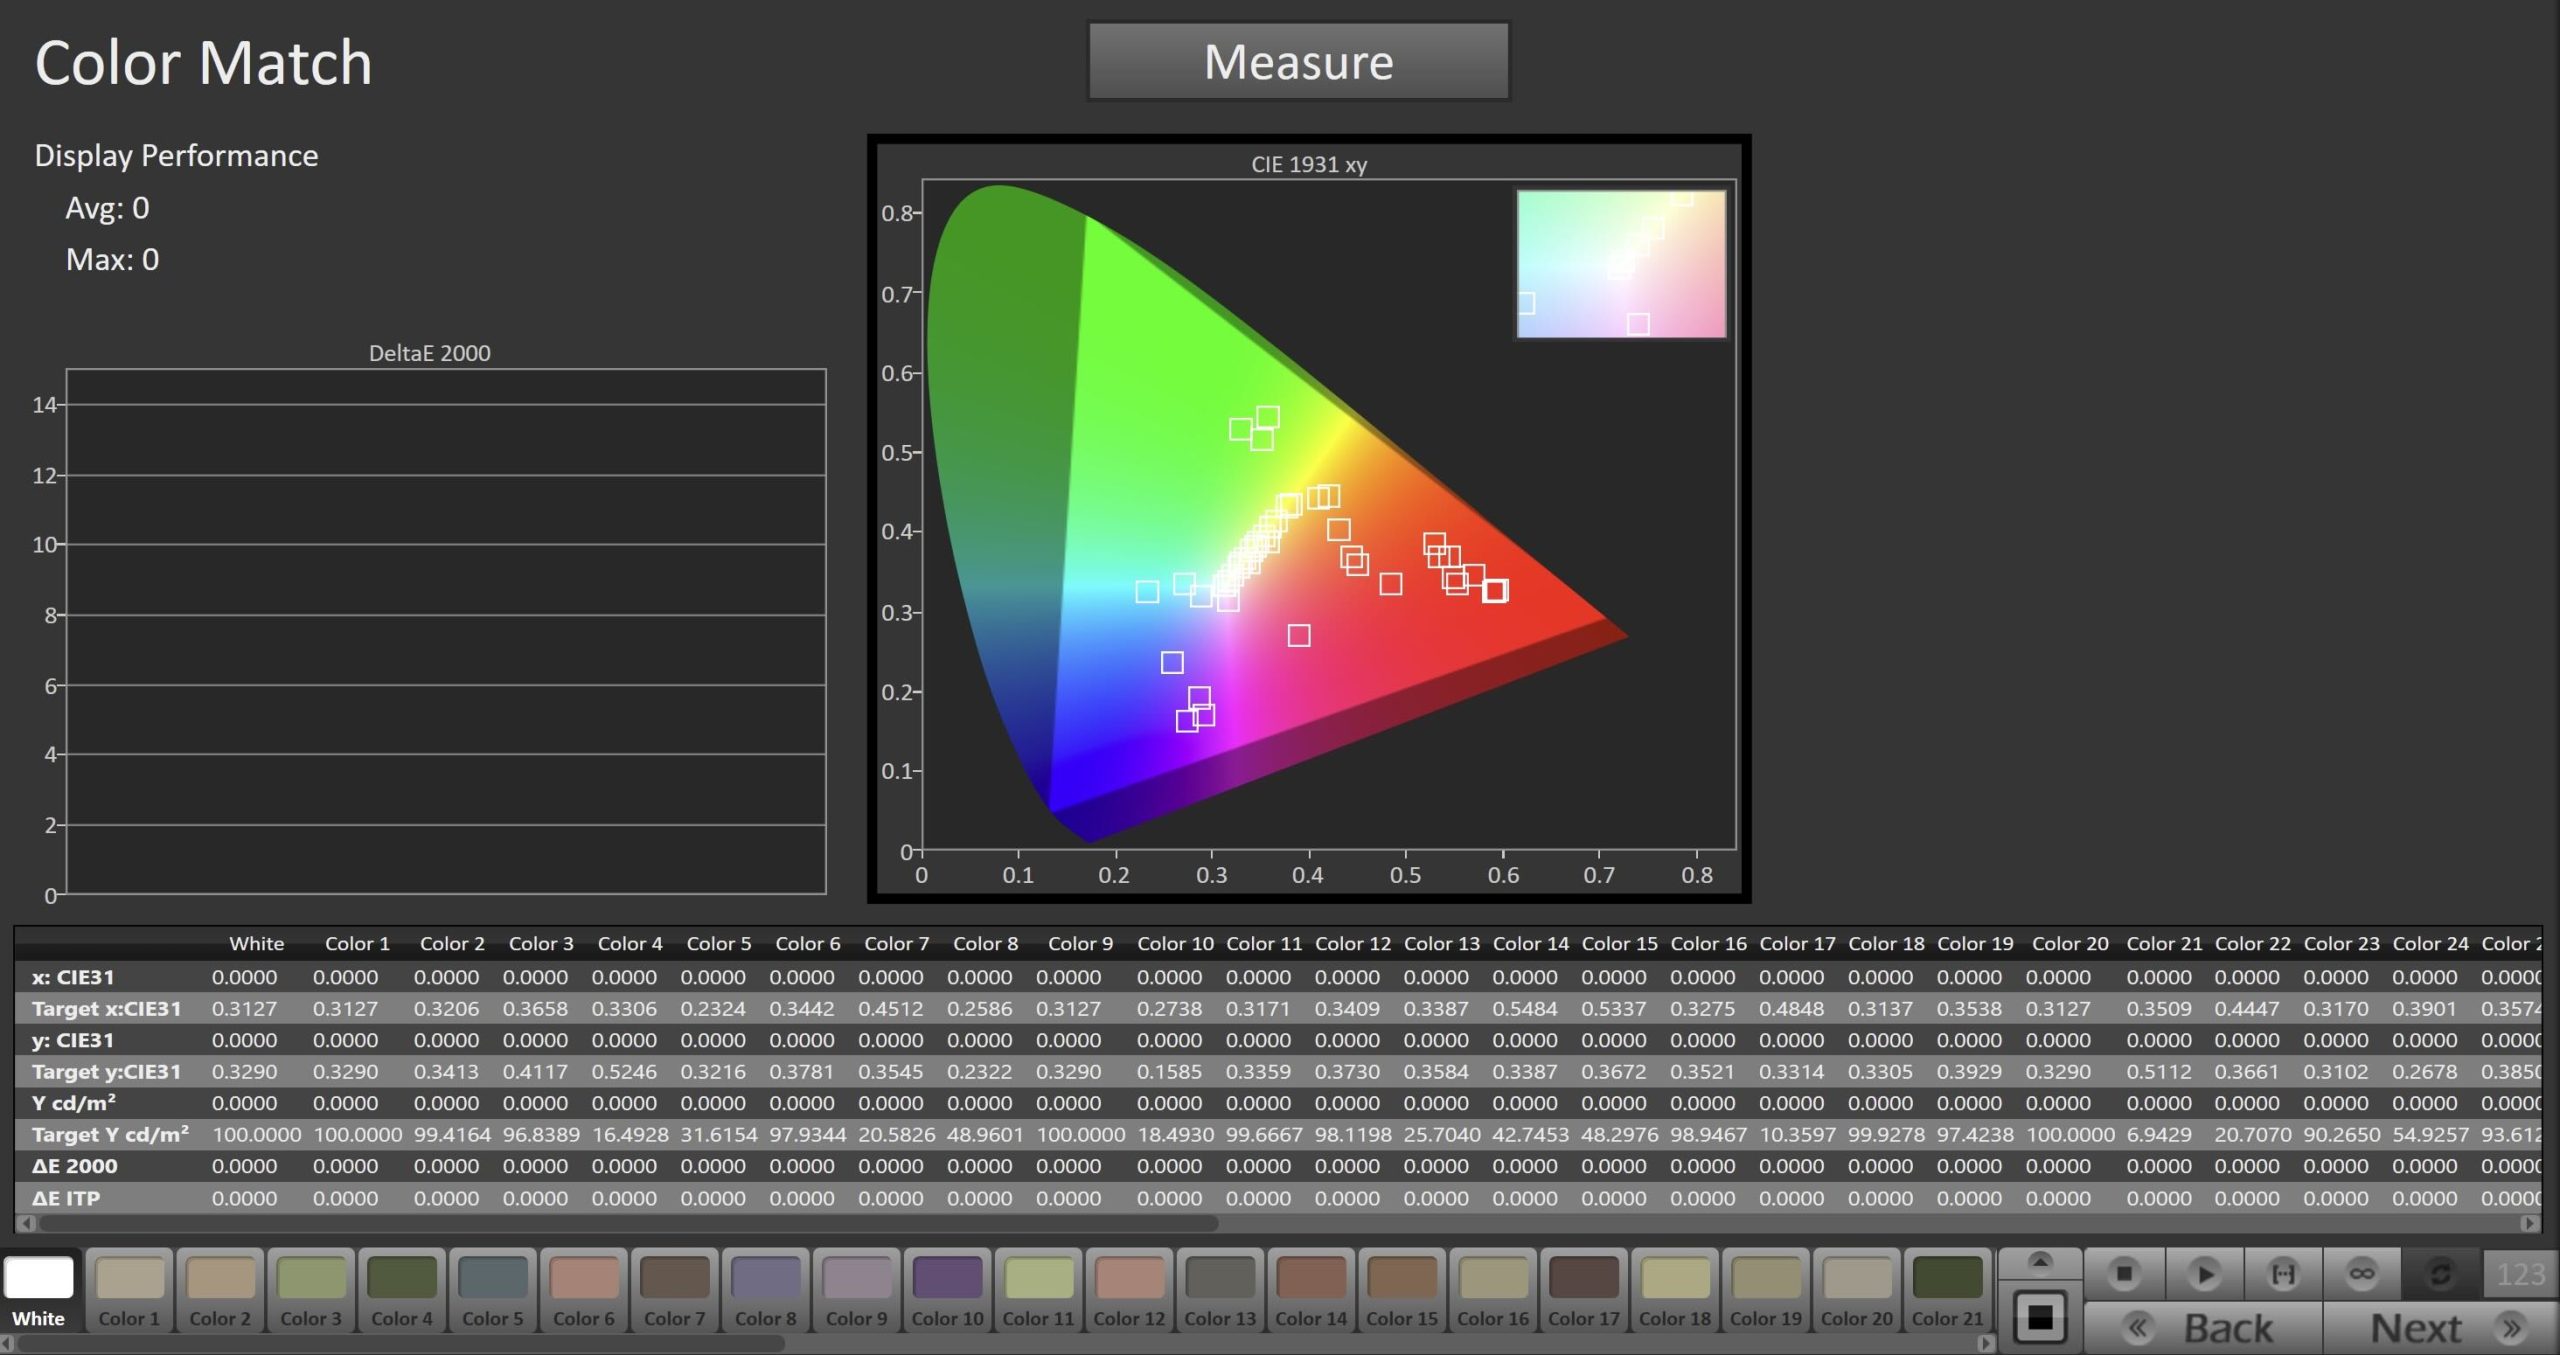
- Click the Measure button to measure the display’s CMS response using the ColorMatch patch set
BT.2020 Gamut Coverage
- This measures the display’s capability to cover the BT.2020 color gamut
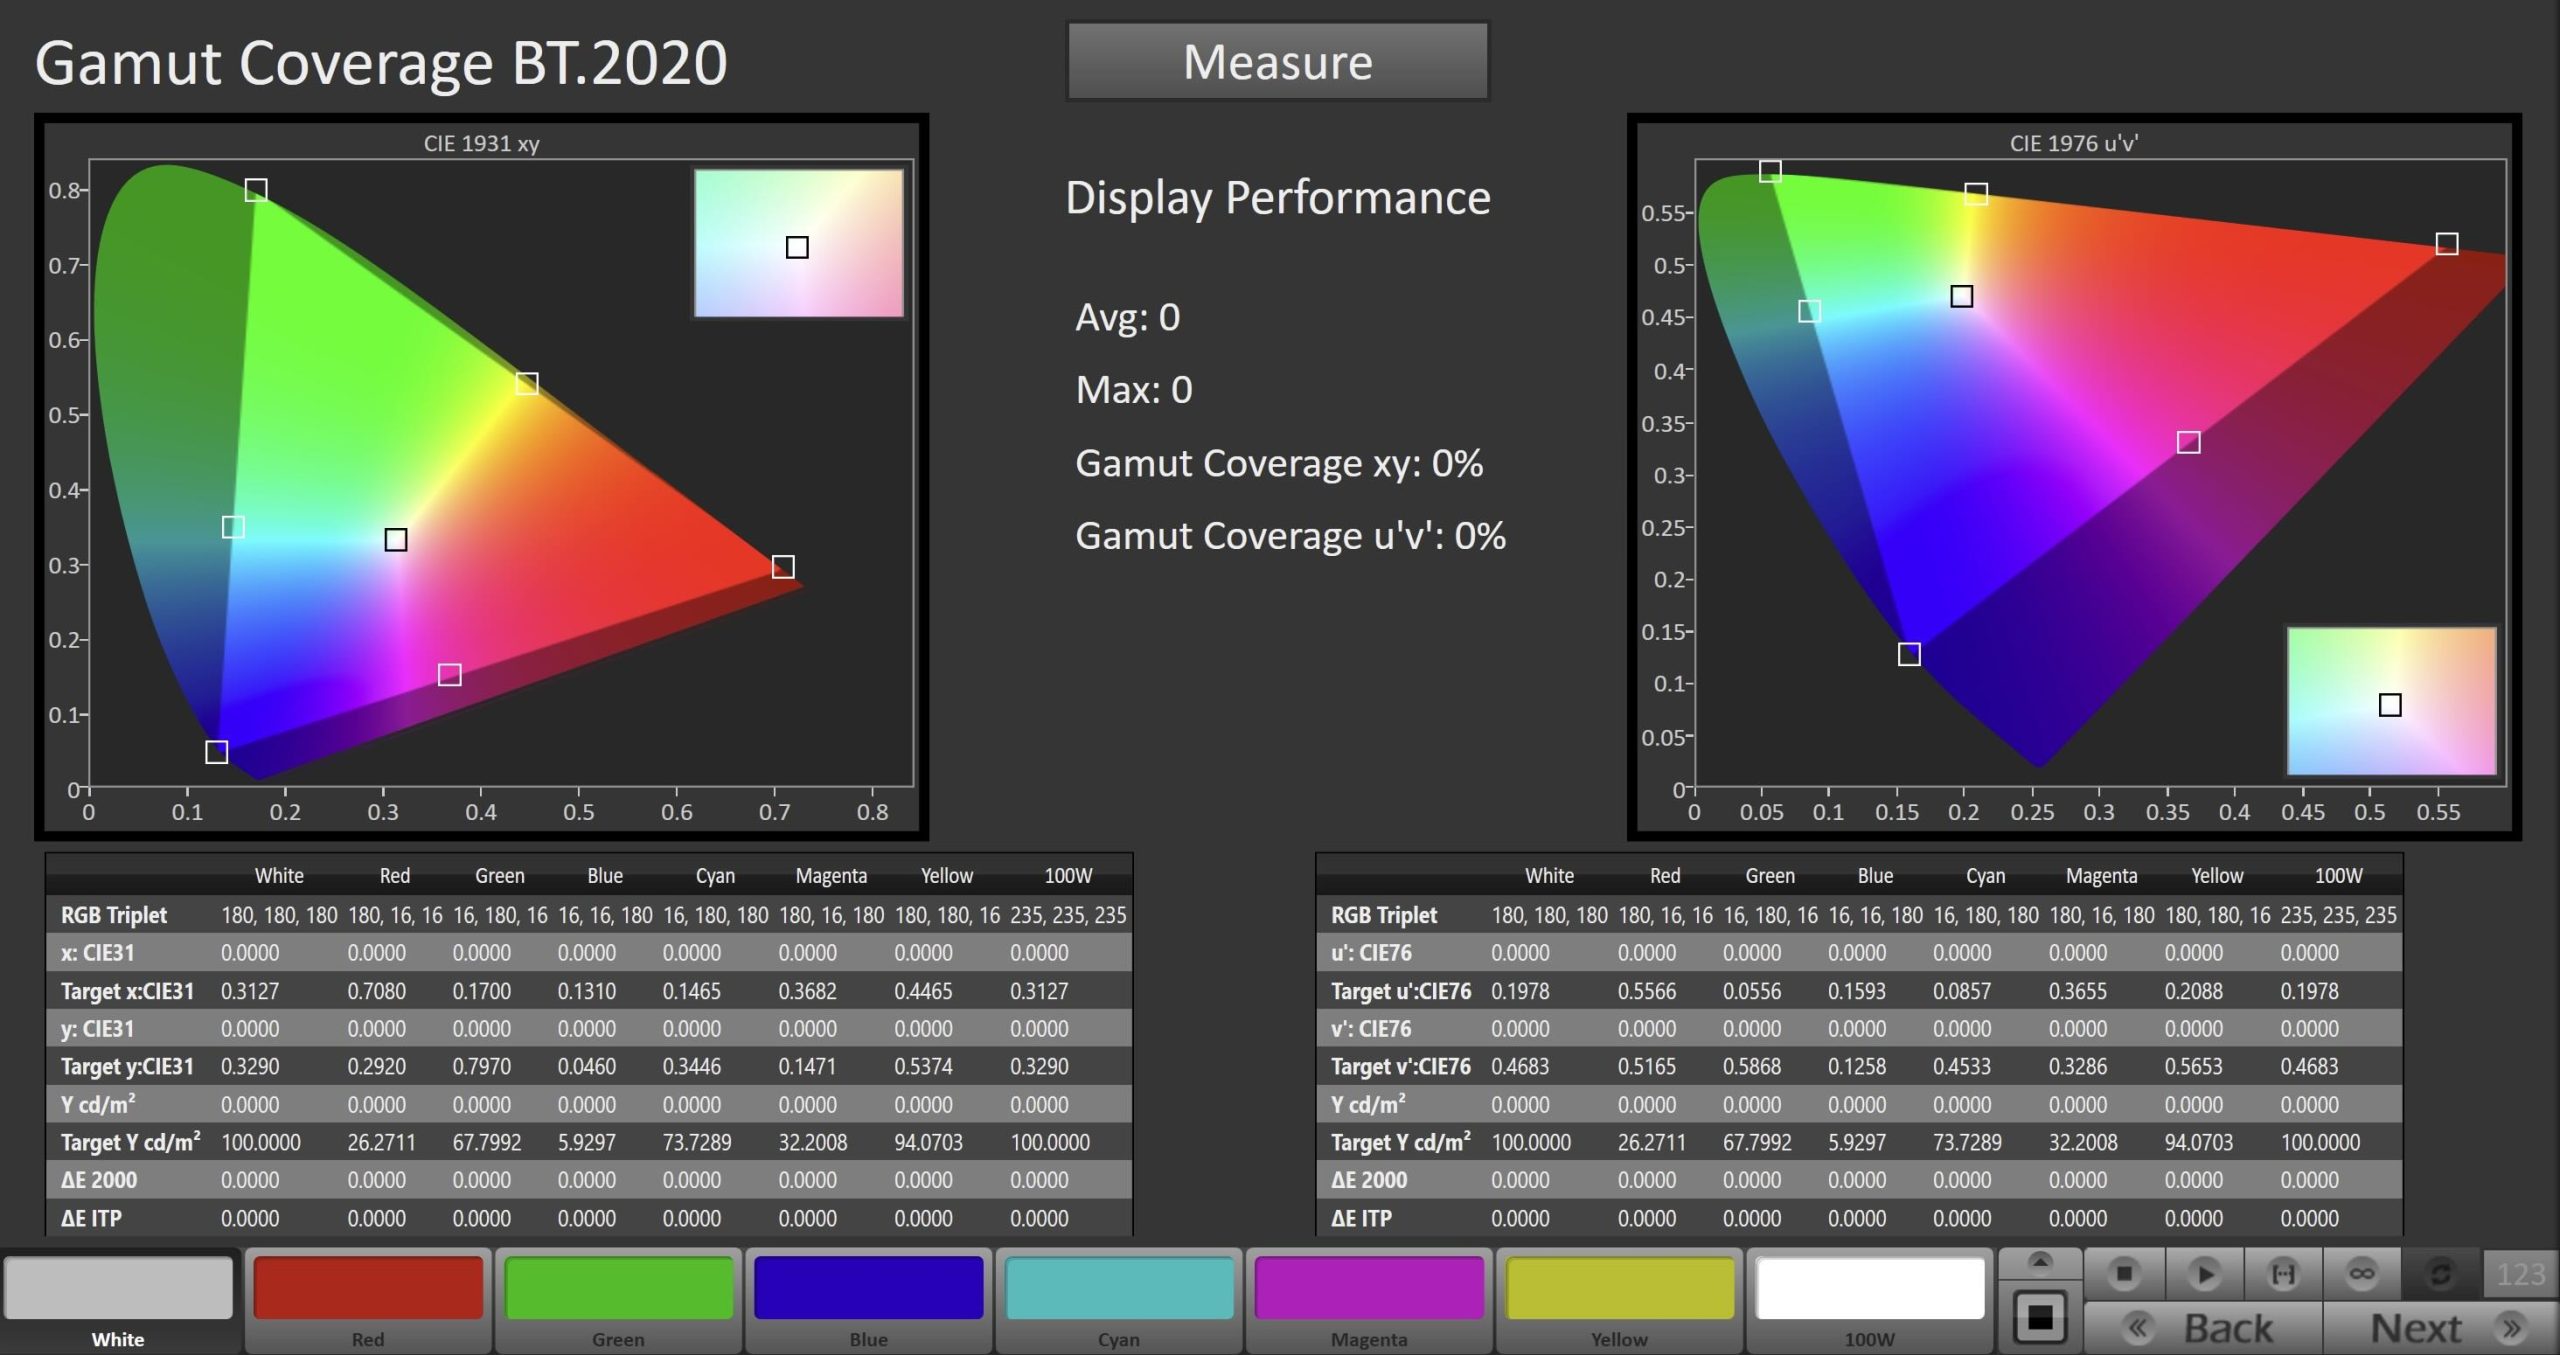
- Click the Measure button to measure the display’s BT.2020 coverage
P3 Gamut Coverage
- This measures the display’s capability to cover the P3 color gamut

- Click the Measure button to measure the display’s P3 coverage
iQIYI Calibration Report
- At the end of each calibration or validation process, you will be able to generate a report that documents the state of the display. This can be saved to PDF or printed for later reference.
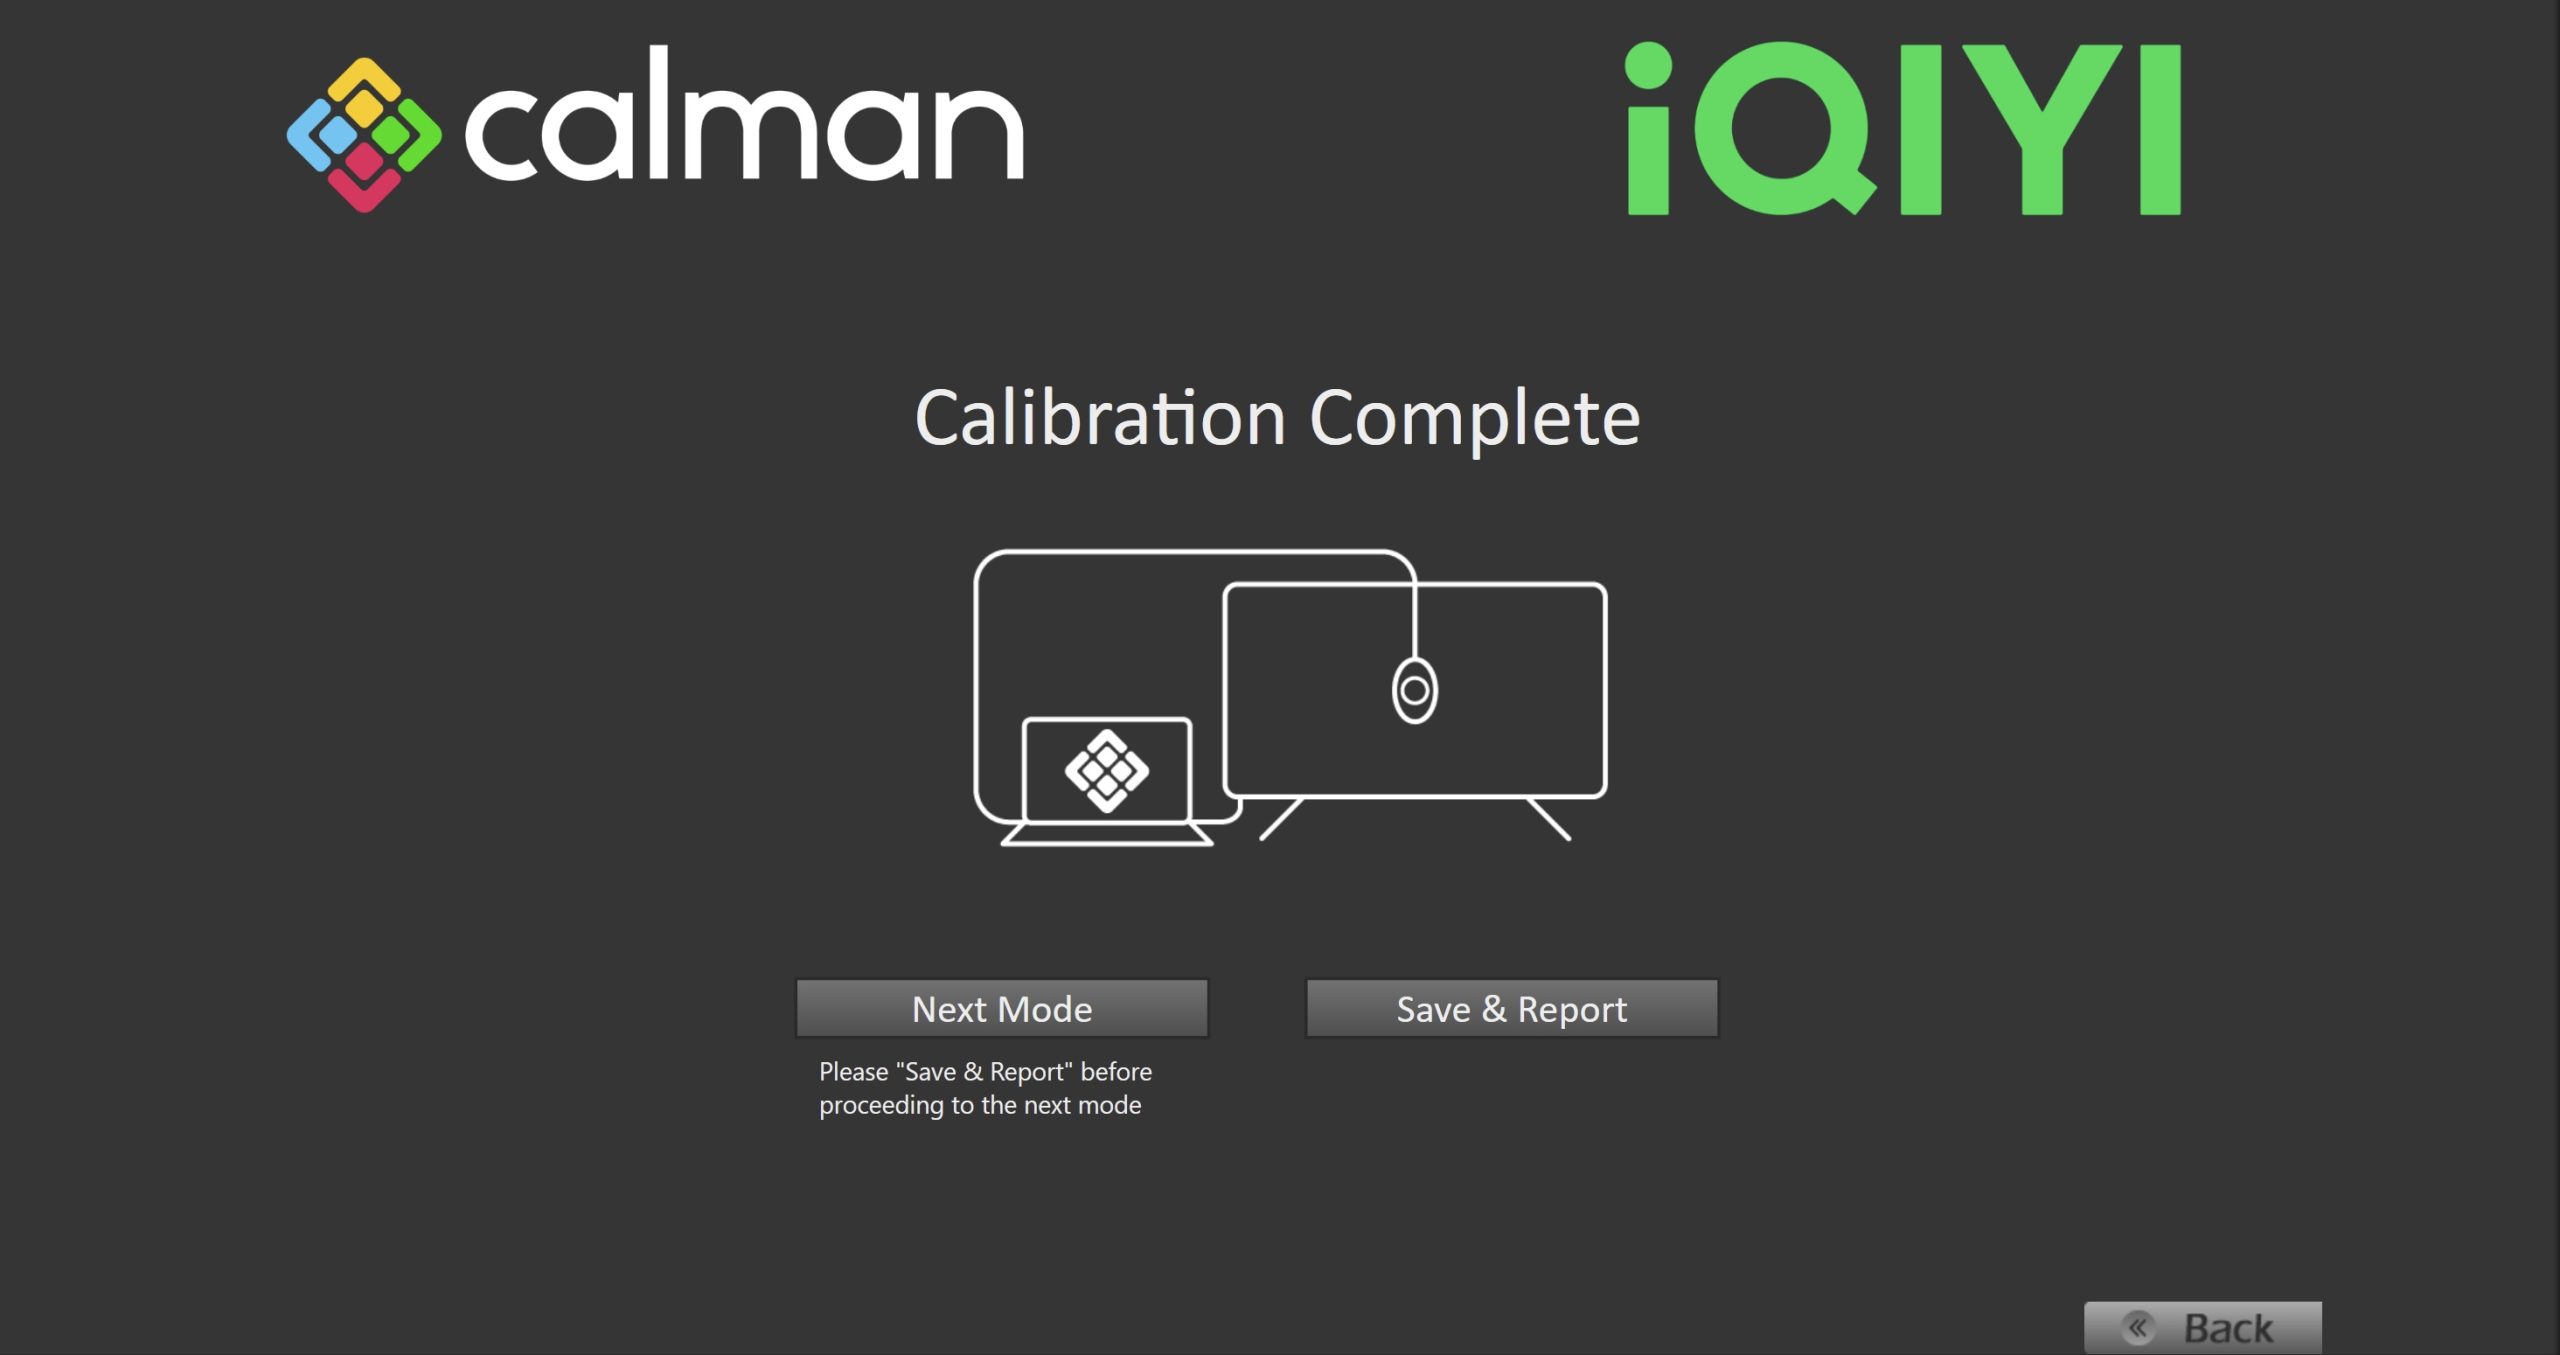
- On the Calibration Complete page, you can select…
- Next Mode:
- Returns to the beginning of the workflow where a new mode or colorspace can be selected
- Note: Does not save workflow or report data, click Save & Report the calibration prior to clicking Next Mode if needed.
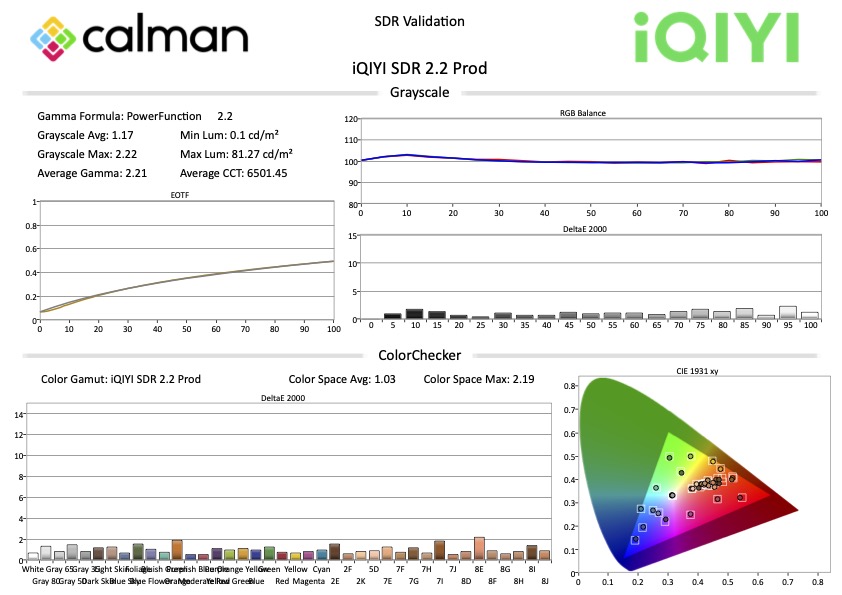
- Save & Report
- Saves the calibration session and generates a matching report (example below)
- Next Mode:
Chinese
此工作流程提供了一整套工具,用于根据爱奇艺的标准验证您的显示器性能。它将引导您完成评估和确认色彩准确度、亮度水平以及整体图像质量的必要步骤,确保您的显示器符合最佳内容呈现所需的规范。
所需Calman 软件版本
- Calman Ultimate v5.16.1 或更高版本
硬件设备要求
设置步骤
- 在左上角的 Calman 菜单Calman Menu中,选择 “打开工作流程模板(Open Workflow Template)” -> “校准(Calibration)”,然后选择 “iQIYI”
- 在介绍画面中,您可以从爱奇艺工作流程中包含的 4 个流程中进行选择。每个流程结束后都会生成一份带有爱奇艺品牌标志的报告。
- SDR 验证
- 用于验证之前的 SDR 校准结果,或当前显示器的灰阶和 ColorChecker 表现。
- HDR 验证
- 包含高级工具,如峰值亮度与窗口尺寸关系图、P3 与 BT.2020 色域覆盖,用于验证之前的 HDR 校准结果或当前显示器在 HDR 模式下的状态。
- SDR 校准
- 包含执行手动 SDR 校准所需的所有步骤。
- HDR 校准
- 包含执行手动 HDR 校准所需的所有步骤。
- SDR 验证
- 选择您要进行的流程后,点击“下一步(Next)”以继续进行硬件连接。
- 将您的色度计插入电脑的 USB 接口,然后点击“查找色度计(Find Meter)”。
- 色度计连接成功后,从下拉菜单中选择您的显示器类型。
- 将图案信号发生器Connect Pattern Source 连接到您的电脑。
- 点击“查找信号源(Find Source)”按钮,然后选择您的信号源。
- 选择图案窗口大小和延迟时间。
- 推荐设置:
- SDR – 全屏图(Full Field),延迟 2 秒
- HDR – 10% 窗口图(10% Window),延迟 2 秒
- 推荐设置:
- 插入测试图案有助于避免面板温度波动,并防止因防烧屏机制而导致的亮度下降。
- 从下拉菜单中选择显示器类型,以自动设定建议值。
- 请确保您的信号源设置为 SDR 或 HDR,需与您之前选择的流程一致。
- 选择你所需的校准/验证目标
- SDR:
- iQIYI SDR 2.2 Prod
- Rec709/Power 2.2/D65
- iQIYI SDR 2.4 Prod
- Rec709/Power 2.4/D65
- iQIYI SDR BT.1886 Prod
- Rec709/BT.1886/D65
- iQIYI SDR 2.2 Prod
- HDR
- iQIYI HDR BT2020 Prod
- BT.2020/ST.2084/D65
- iQIYI HDR P3 Prod
- P3/ST.2084/D65
- iQIYI HDR BT2020 Prod
- SDR:
- 点击“下一步(Next)”继续操作
SDR 校准
第一步
- 在此步骤中,您将对显示器进行校准前的测量。这些数据将用于与校准后的结果进行对比。
- 要进行校准前测量,点击“测量(Measure)”按钮,对显示器的灰阶和 ColorChecker 表现进行测量。
- 这些数据将作为参考点,用于与校准后的结果进行比较。
- 点击“下一步(Next)”继续操作。
第二步
- 在此步骤中,您可以调整显示器的亮度,以匹配您所设定的目标值。
- 点击“连续读取(Read Continuous)”按钮,测量显示器在 100% 白色时的亮度,并将峰值白色调整到您所需的亮度水平。
- SDR 的参考亮度为 100 尼特,但根据您所在环境的环境光,可能需要设定更高的目标亮度。
- 调整背光控制,使显示器的亮度比最终目标亮度高约 15%,以补偿下一步进行 1D LUT 校准时亮度的下降。
- 完成亮度调整后,点击“停止(Stop)”按钮。
- 点击“下一步(Next)”继续操作。
第三步
- 在此页面,您可以调整显示器的白平衡,或称为 2 点灰阶校准。默认的校准点为 20% 和 100%,适用于大多数显示器,但如果您的显示器在其他亮度点进行灰阶调整,也可以选择不同的校准点。
- 使用“连续读取(Read Continuous)”按钮测量所显示的两个灰阶图案中较高亮度的那个,可通过右侧的下拉菜单进行修改。
- 调整 RGB 增益/高位控制(Gain/High),以尽可能降低 DeltaE 2000 值(参考最右侧的图表)。
- 如果显示器提供 RGB 偏移/低位控制(Offset/Low),请使用“连续读取”按钮测量 20% 灰阶图案,然后调整 RGB 低位控制,同样以尽可能降低 DeltaE 2000。
- 点击“下一步(Next)”继续操作。
第四步
- 此页面允许您调整显示器的多点灰阶(Multipoint Greyscale)。并非所有显示器或图像模式都支持此选项。
- Calman 底部的图案滑块将预设加载一个从 0% 到 100% 的 21 点灰阶阶梯图。
- 如果您的显示器使用不同的调整点,您可以在“测量(Measure)”按钮旁的下拉菜单中选择其他灰阶阶梯图。
- 在显示器上点击您正在调整的测试图案,并按下“连续读取(Read Continuous)”按钮,在调整过程中持续读取数据。
- 完成后,点击“下一步(Next)”继续操作。
第五步
- 此页面将允许您调整显示器上的色彩空间/色彩管理系统(Colorspace/CMS)控制项。
- 在显示器上点击您要调整的测试图案,并按下“连续读取(Read Continuous)”按钮,在调整过程中持续读取数据。
- 在切换到下一个测试图案之前,请先点击“停止(Stop)”按钮。
- 完成后,点击“下一步(Next)”继续进行 SDR 验证。
SDR 验证
- 要进行 SDR 验证测量,请点击“测量(Measure)”按钮,对显示器的灰阶和 ColorChecker 表现进行测量。
HDR 校准
第一步
- 在此步骤中,您将对显示器进行校准前的测量。这些数据将用于与校准后的结果进行对比。
- 要进行校准前测量,请点击“测量(Measure)”按钮,测量显示器的灰阶和 ColorChecker 表现。
- 这些数据将作为基准,用于与校准后的结果进行比较。
- 点击“下一步(Next)”继续操作。
第二步
- 在此页面,您可以调整显示器的白平衡,或称为 2 点灰阶校准。默认的校准点为 20% 和 100%,适用于大多数显示器,但如果您的显示器在不同的亮度点进行灰阶调整,也可以选择其他校准点。
- 使用“连续读取(Read Continuous)”按钮测量所显示的两个灰阶图案中亮度较高的一个,可通过右侧的下拉菜单进行修改。
- 调整 RGB 增益/高位控制(Gain/High),以尽可能降低 DeltaE 2000 值(参考最右侧的图表)。
- 如果有 RGB 偏移/低位控制(Offset/Low),请使用“连续读取”按钮测量 20% 灰阶图案,然后调整 RGB 低位控制,同样以尽可能降低 DeltaE 2000 值。
- 点击“下一步(Next)”继续操作。
第三步
- 此页面将允许您调整显示器的多点灰阶(Multipoint Greyscale)。并非所有显示器或图像模式都支持此选项。
- Calman 底部的图案滑块将预设加载一个从 0% 到 100% 的 21 点灰阶阶梯图。
- 如果您的显示器使用不同的调整点,您可以在“测量(Measure)”按钮旁的下拉菜单中选择其他灰阶阶梯图。
- 在显示器上点击您正在调整的测试图案,并按下“连续读取(Read Continuous)”按钮,在调整过程中持续读取数据。
- 完成后,点击“下一步(Next)”继续操作。
第四
- 此页面将允许您调整显示器上的色彩空间/色彩管理系统(Colorspace/CMS)控制项。
- 在显示器上点击您要调整的测试图案,并按下“连续读取(Read Continuous)”按钮,在调整过程中持续读取数据。
- 在切换到下一个测试图案之前,请先点击“停止(Stop)”按钮。
- 完成后,点击“下一步(Next)”继续进行 HDR 验证。
HDR 验证
峰值亮度
Portrait Displays 不保证所有图案生成器都能正确支持此功能。建议使用 Portait VideoForge Pro 或 Portrait G1 图案生成器。
- 峰值亮度与窗口尺寸测试将在八种不同的测试图案窗口尺寸下进行亮度测量,范围从 1% 窗口到 100% 全屏,以帮助评估显示器在不同 HDR 内容下的表现能力。
- 点击“测量(Measure)”按钮开始测试。
- 测量完成后,请将窗口尺寸重置,再继续下一步操作。
灰阶
- 点击“测量(Measure)”按钮,以测量显示器的灰阶表现。
ColorChecker®
- 点击“测量(Measure)”按钮,使用 X-Rite ColorChecker 色块集测量显示器的 CMS(色彩管理系统)响应。
ColorMatch
- 点击“测量(Measure)”按钮,使用 ColorMatch 色块集测量显示器的 CMS(色彩管理系统)响应。
BT.2020 色域覆盖率
- 此项测试用于测量显示器对 BT.2020 色彩空间的覆盖能力。
- 点击“测量(Measure)”按钮,测量显示器对 BT.2020 色域的覆盖率。
P3 色域覆盖
- 此项测试用于测量显示器对 P3 色彩空间的覆盖能力。
- 点击“测量(Measure)”按钮,测量显示器对 P3 色域的覆盖率。
爱奇艺校准报告
- 在每次校准或验证流程结束时,您都可以生成一份报告,记录显示器的状态。该报告可保存为 PDF 文件或打印,以供日后参考。
- 在“校准完成(Calibration Complete)”页面,您可以选择以下操作:
- 下一模式(Next Mode):
- 返回到工作流程的起始页,可选择新的模式或色彩空间
- 注意:此操作不会保存当前工作流程或报告数据,如需保存,请在点击“下一模式”之前先点击“保存并生成报告(Save & Report)”。
- 保存并生成报告(Save & Report):
- 保存本次校准会话,并生成对应的校准报告(如下图所示)。
- 下一模式(Next Mode):